On regular days, Steam is a great way to play games and manage your library. This creation from Valve has changed the way most people enjoy games on their PC and Mac. Nevertheless, there are cases when Steam does not work as it should. And for a gamer, it can be one of the most frustrating times ever. Fortunately, a lot of these errors do not require much time for fixing, either. And you’d be happy to know that the Steam stuck on preallocating error is one of those errors that you can fix easily.
Before we tell you how it works, there are some things you should know about the error itself.
Table of Contents
What is the Steam Stuck on Preallocating Error?
The Steam stuck on preallocating error occurs when the Steam client keeps stuck with a message that Steam is allocating disk space for the game. Normally, you will see the message for a few seconds, and it will move to the next screen. However, the issue becomes an error when the screen does not move forward. If it keeps on the screen, you will not be able to play the game. Sometimes, the error screen may persist for hours or more. We hope you understand how annoying the Steam stuck on preallocating error is.
What Causes the Steam Stuck on Preallocating Error?
Here are some potential factors that can cause the Steam stuck on preallocating error.
1. Download Cache Full
Download cache storage is one of the crucial aspects of the Steam client. However, when the storage space is full, you may face the Steam stuck on preallocating error. When the storage space is full, the preallocation message will keep showing on the screen.
2. Firewall
Once again, Windows Firewall is an important part of the Operating System. On usual days, it helps your PC from unauthorized access from different sources. Sometimes, however, the same firewall can block Steam from finishing the preallocation process.
3. Overclocking
Overclocking is often done by gamers who need maximum performance for their games. However, in some instances, overclocking is the reason why the Steam stuck on preallocating error appears. Due to the same reason, many experts recommend resetting your PC to factory settings to keep the Steam client error-free.
4. Antivirus Programs
Antivirus programs are also responsible for the Steam stuck on preallocating error if you think about it. Like a firewall, antivirus programs may also blacklist the Steam client as a problematic program (which is not the case, of course.) As a result, Steam may not be able to perform regular tasks, such as disk preallocation.
5. Download Server Issues
Did you know that Steam has different download servers in different regions? Depending on where you are from, these download servers are used. Sometimes, if one of these servers is not working, you may see the Steam stuck on preallocating error.
In addition to these, problems with the Steam client are also responsible for the Steam stuck on preallocating error. Unfortunately, you cannot find a universal reason/solution for the issue. It means you will have to try different methods until one works.
Well, it is what we have done in the guide. Below, you can find different methods that you can use to get rid of the Steam stuck on a preallocating error from your computer.
How to Fix the Steam Stuck on Preallocating Error?
We have covered both the basic and advanced solutions that can help you eliminate the Steam stuck preallocating error from your PC.
Method #1 Basic Solutions
Before we explore solutions specific to the Steam client, you should try some basic solutions. It is difficult to explain why these steps solve the Steam stuck on preallocating error. As it happens, though, you can get rid of the error in some cases. And it is great if you can solve the preallocating error message without going in so deep, right?
- You have to make sure that your PC has an active internet connection. Sometimes, even when you’ve connected to the WiFi network, you may not have internet access. In these instances, you will likely come across the Steam stuck on preallocating error. Therefore, as soon as you see this error message, you have to check whether you have internet access.
- It is also important to ensure that your PC meets the basic requirements of the game. In some cases, your old PC may not have enough resources to properly install and run a new game. Therefore, you must have a clear understanding of the PC configuration. Many have reported that they were able to get rid of the Steam stuck on preallocating error after upgrading to a better system configuration.
- Another important aspect you have to double-check is whether Steam has admin privileges on your PC. If it does not have admin privileges, the Steam client may have trouble setting things up and may show you the Preallocation error page. You can make it possible by going to Steam.exe > Right-click > Compatibility > Run this program as an administrator.
- If you are seeing the Steam stuck on preallocating error for the first time, you should restart your PC once. If the error occurred due to temporary files and mismatches, a clean restart should solve the issue. As a result, you will have access to Steam and the library after the reboot. If the issue persists even after the reboot, you can move to specific solutions.
If these steps have not solved the error, it means the problem has to deal with the Steam client. Don’t worry; we have compiled the most effective methods for the same.
Method #2 Remove Existing Download Cache
Deleting the download cache has been an effective method to get rid of the Steam stuck on preallocating error. As we said earlier, the process will remove all the cache files that Steam has downloaded in the past. Using this method, you can make room for more storage space and accommodate the new game that you want to install.
The steps you have to follow are:
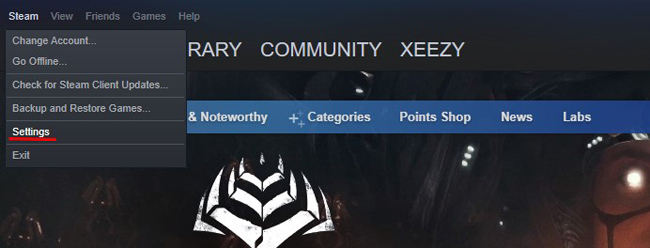
- Open the Steam client on your PC and click on the ‘Steam’ button that you can see on top-right.
- From the upcoming menu, choose ‘Settings.’

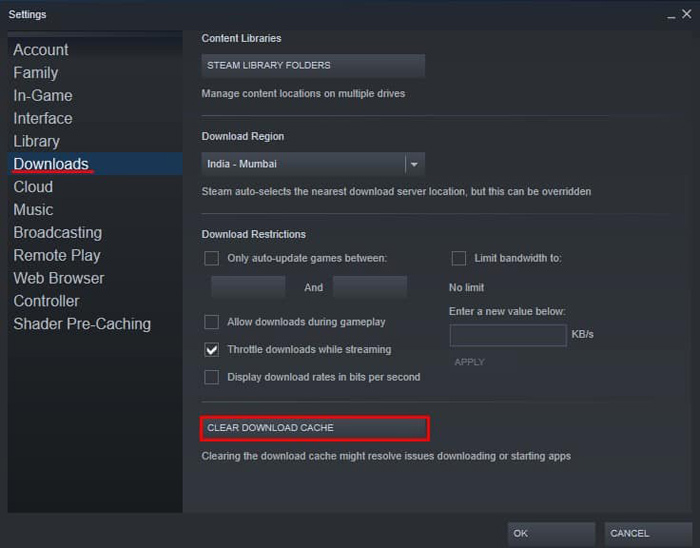
- On the left side, you can see a sidebar panel. Click on ‘Downloads’ to proceed.
- Once you are in the Downloads tab, you can find a number of options
- Now, go ahead and click on the ‘Clear Download Cache’ button.

If asked, you will have to confirm the action. In a few seconds, the Steam client will remove download cache content from the system. We recommend restarting your PC after the download cache removal to smoothen the fix.
Method #3 Try Different Download Servers
As we said, a faulty download server can also cause the Steam stuck on preallocating error. So, it is good to check if the problem persists when you change the download server. To do this,
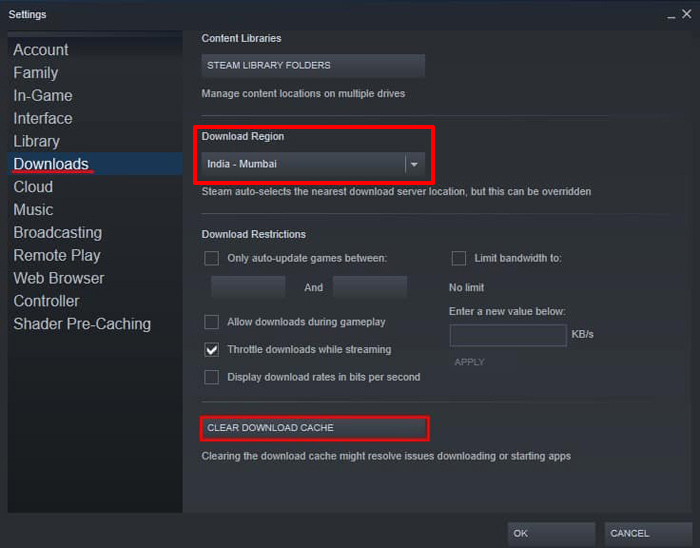
- Follow the steps from the previous method and launch the ‘Downloads’ tab on the Settings page.
- You can find a section called ‘Download Region.’

- Now, from the drop-down menu, you can select another download region for Steam
Once you have made the changes, you can click on ‘OK’ and close the Steam client. For better efficiency, you can consider reconnecting to the internet.
Method #4 Disable Overclocking on Your PC
If you have overclocked your PC, it may be consuming more resources than it should. It means you are likely to come across the Steam stuck on preallocating error. So, it will be an effective method to turn off all the options for overclocking and see if the problem persists.
If the Steam stuck on preallocating error goes away when you have disabled overclocking, you are good to go.
To disable overclocking, you have to follow the steps you went through for enabling it in the first place. Based on the PC and the motherboard, you may have a simple tool for speed management. You can use this option if you want to spend the least amount of time and effort.
Method #5 Disable Windows Defender Firewall
You can try disabling the Windows Defender Firewall if you want to get rid of the Steam stuck preallocating error from your computer. Of course, permanently disabling the firewall is not a good idea. But, it will help you understand whether the firewall is blocking the Steam client from performing the basic functions.
To turn off Windows Defender Firewall, you have to,
- Open Control Panel using the Start Menu or Search
- From the available options, choose Windows Defender Firewall
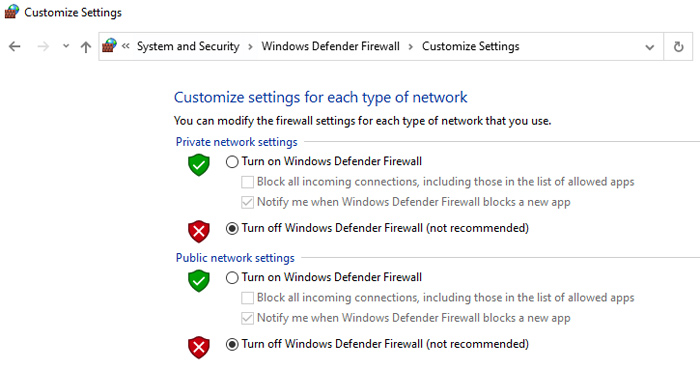
- You can select the option ‘Turn Windows Defender Firewall on or off’ from the sidebar menu
- On the next pop-up screen, you have to provide Yes
- Wait until the next screen, where you can Turn off Windows Defender Firewall

As we said, we do not recommend keeping the firewall turned off all the time. It should be considered as a temporary measure to understand why you are seeing the Steam stuck on preallocating error.
Method #6 Miscellaneous Tips
Here are some other steps you can try to fix the Steam stuck on preallocating error.
You may have noticed that the Steam stuck on preallocating error appears when there is a shortage of system resources. Therefore, you can always consider upgrading your system to better hardware. For instance, we recommend ditching the old HDD for a brand-new SSD. While SSDs are expensive, they provide impressive transfer speeds and improved gaming experiences. People have noticed that they come across fewer Steam stuck on preallocating errors after upgrading to an SSD-based PC.
If the problems do not get solved after upgrading, you will have to reinstall Steam on the system. To do this, you can go to Apps and remove the Steam client first. After that, you can download the Steam setup file via the official website and install it. Make sure that you go for a fresh installation when prompted. Because all things are on the cloud, you can sign in using the Steam account for the best results. If the problem does not get solved, you can consider reinstalling Windows OS as well.
If nothing helps, you have the ultimate solution of contacting Steam support. The official support channels are great at solving device-specific problems. Alternatively, you can go through Steam support forums where you can find other users who face the same issue.
How to Avoid the Steam Stuck on Preallocating Error?
To be honest, there is no universal way to avoid the Steam stuck on preallocating error. As we said, it happens due to a number of factors. Some of these factors are not under your control. For instance, if Steam servers are down, you may see the Steam stuck on the preallocating error page. There isn’t much you can do about this part, right?
Having said that, understanding the requirements of the game you download will definitely reduce the total frequency of the error messages. It means you should not put your computer in a situation where it has to do a lot of calculations to find the storage space. You can also use third-party applications to clean your PC and free up storage space before you begin downloading a game on Steam.
Frequently Asked Questions

What does Preallocating mean on Steam?
On Steam, Preallocating means the Steam client is finding the right amount of storage space and other digital resources for the game that you have downloaded. The process includes not only the allocation but also the pre-allocation aspects, such as compatibility checks.
How do I make Steam allocate disk space faster?
First of all, you should have high-speed hardware at your disposal. If you use a very old HDD, you can’t expect to have super-high disk allocation speeds. On the other side of the spectrum, you should see if your firewall or antivirus is not blocking the Steam client from accessing the file system.
What causes the Steam Stuck on Allocating Disk Space Error on Windows?
Both hardware and software errors can cause the said error on Windows. For instance, in some cases, a lot of download cache files can slow down the process. Similarly, you consider your internet connection as the prime suspect. In some cases, hybrid scenarios are also responsible for the error.
The Bottom Line
As you have seen, the Steam download stuck on preallocating error can be a little tricky at times. But we are sure that you can solve the issue using one of the methods we have covered above. Even in the worst-case scenario, a factory-reset PC with a newly-installed Steam client should do the trick.


Leave a comment
Have something to say about this article? Add your comment and start the discussion.