There may be occasions when you want to migrate a WordPress blog from one hosting service to another without your blog going down while you are doing it. A seamless transition is generally better than having a ‘Maintenance‘ notice displayed on the screen.
Important: Do not inform your existing host of your intention to change until you are sure your blog works correctly on your new web host. They might cancel your account immediately, follow the instructions below and make sure that your blog actually runs as it should in your new web space before telling you current host anything.
To achieve this, the general strategy is to copy your blog to your new web hosting service and then test it while maintaining the visibility of your blog on your existing hosting service. You can do this by tricking your computer into believing that your blog is hosted by your new server, while the blog is still visible others on your existing web host. Here’s how you do that.
Copying Data to Your New Web Hosting Service
You must copy your blog data over to the new host. There are several ways to do this, as explained below. If your data has been transferred incorrectly, you will find that out while your blog is still running on your original web host.
We suggest you carry out this process on a day when you traditionally get fewest visitors and comments. That is because your ‘comments’ are stored in your database, and you may lose some between switching hosts, even if that is a relatively short period of time.
Data to Transfer
The data being transferred is:
- A copy of your current wp-content folder (Techlila-HG-backup.zip), and
- A copy of your MySQL database
There are two fundamental ways to achieve this transfer:
- Manually, using copies, FTP or backups, and
- Using a software script.
Method 1 is suitable for beginners with small blogs, while method 2 is more suited to professional bloggers who have large volumes of data to transfer.
Install WordPress and Create Database
Whichever method you use, you first have to install WordPress on your new web host. With Bluehost, this is an easy process. Simply use the WordPress installation link available from cPanel – generally provided in the Fantastico suit of auto-installation scripts. Read this article for step by step procedure: How to Install WordPress Using cPanel.
Here is how to backup your WordPress content files and transfer them to your new blog using both methods. We shall then explain how to migrate your MySQL database. First the content, contained in the wp-content folder.
Method 1: Manual File Transfer and FTP (Small Blogs)
Having installed WordPress in your new web host, you will then have to transfer your blog files from your old host to your new host. If you have a relatively small blog you can manually transfer your files using the upload facility on your new host, or even FTP the files using FTP software. There are many free FTP (file transfer protocol) programs available online, such as FileZilla.
You should clear cache if you’re using any cache plugin (Use ‘empty all cache’). Delete inactive plugins and themes also delete your old database backup files. Use any method provided below to download your wp-content folder in your PC:
a) Using FTP Software: If you understand how to use ftp clients such as FileZilla or Core FTP, then this is quick and easy for a small blog with few posts and pages. Simply connect the new and old domains using FTP software and copy your wp-content folder from one location to the other.
b) Manual Method: Create a zip file of your wp-content folder in cPanel and download the wp-content.zip file on your PC.
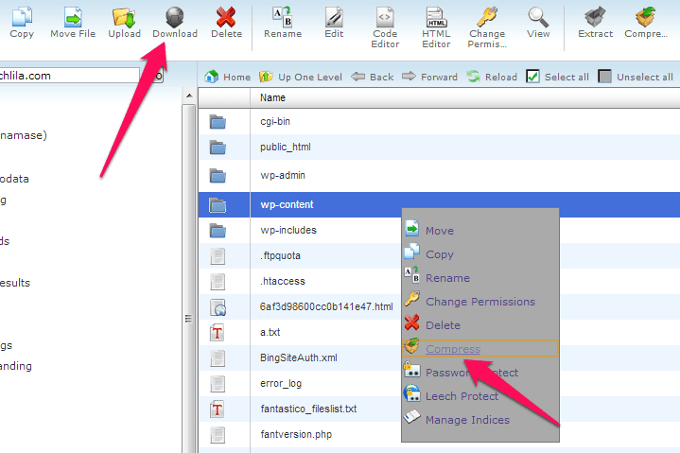
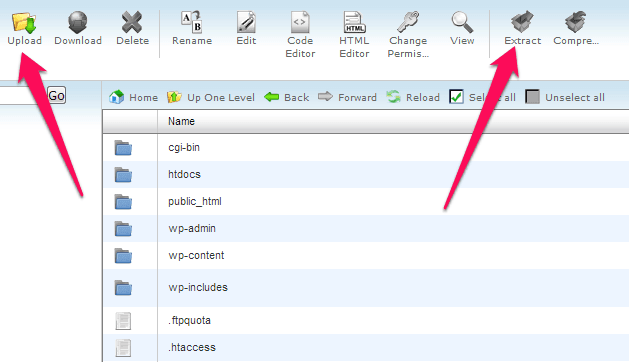
You can then upload that to your new host when you are ready. Extract it, it will ask for replacing the files then click Okay.
c) Backup MySQL Database: In addition to your wp-content files, you will also have to export your relevant MySQL database to your new server.
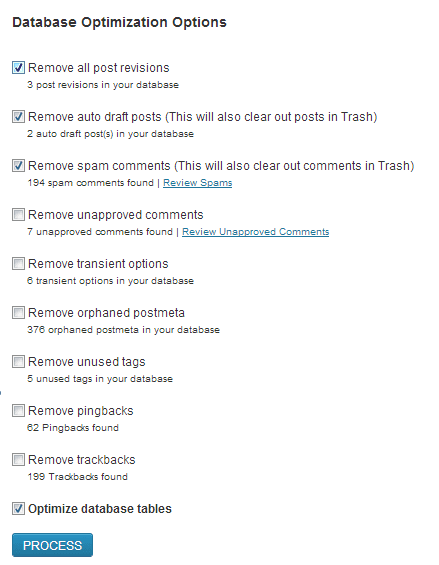
Before taking backup of your database, install WP-Optimize plugin in your blog. Using the option provided in this plugin – remove all post revisions, remove auto-draft posts, remove spam comments and optimize database tables.
This will clean up your blog by removing any unnecessary content and files, reducing the amount of data you have to migrate.
Now take the backup of your blog database. There are two ways to backup your database:
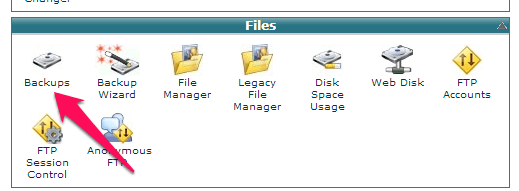
i. cPanel Backup: If your current web host uses cPanel, click on the ‘Backup’ icon and scroll down to ‘Download a MySQL Database Backup’. Click on the database you want to backup. A new window will appear – choose to Save, then save on a folder in your PC. You will download it from there later. If you have a different type of control panel, that should offer a similar type of backup service.
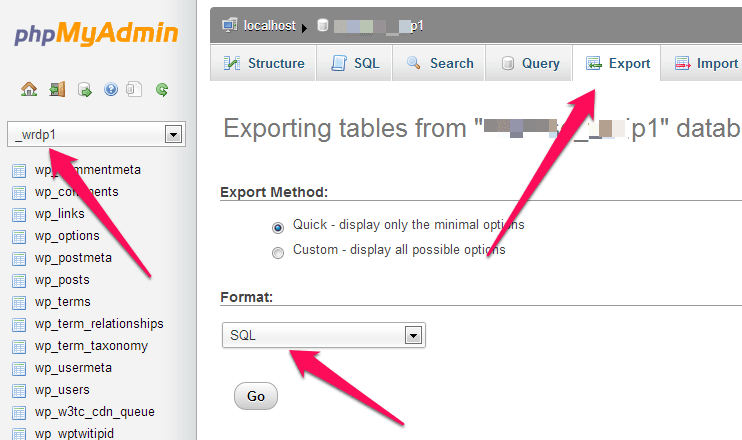
ii. phpMyAdmin: You can also use phpMyAdmin to transfer your databases – you will also find this on cPanel. Click on ‘databases’ then choose the database to export. Click on ‘export’ then choose ‘All Tables’ – then SQL as the export type. This will also create a backup of your database on your computer.
Migrating the Database
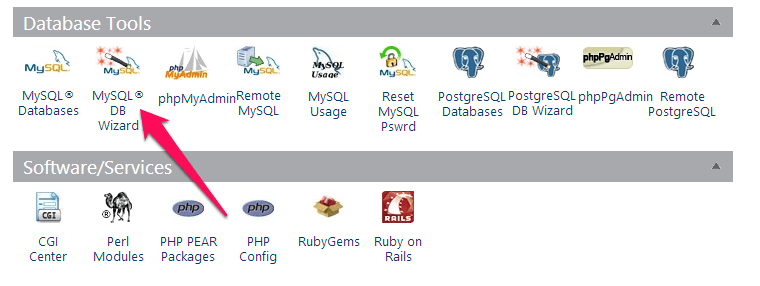
Before you migrate the database data, you will first have to create a database on your new web host. Go to the cPanel on your new web host. Go to ‘Databases‘ then click on ‘MySQL Database Wizard‘.
Now:
- a) Enter the name for your database,
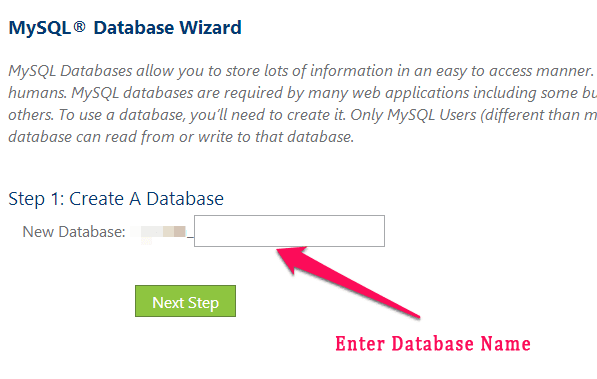
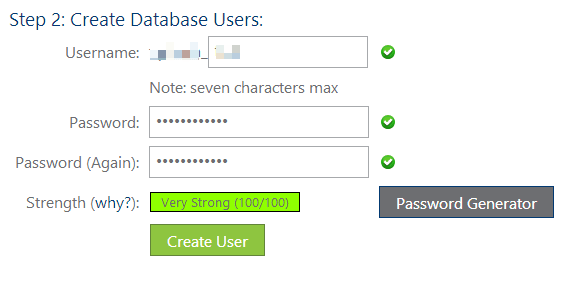
- b) Enter a username and password when prompted. It’s easiest, but not necessary, if you give it the same name, username and password as the database on your original host. Make sure the db_host (in some hosts you’ll not see this option) is set to ‘localhost‘.
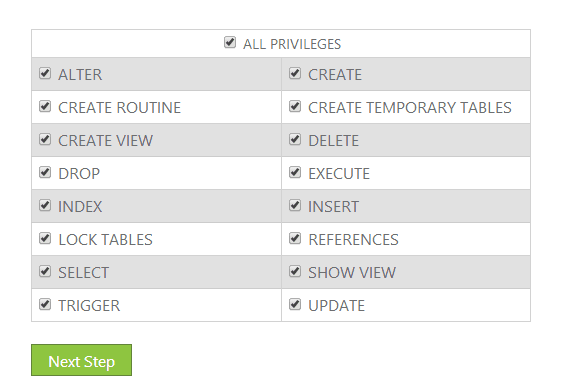
- c) Click the ‘All Privileges‘ check box and your database is ready.
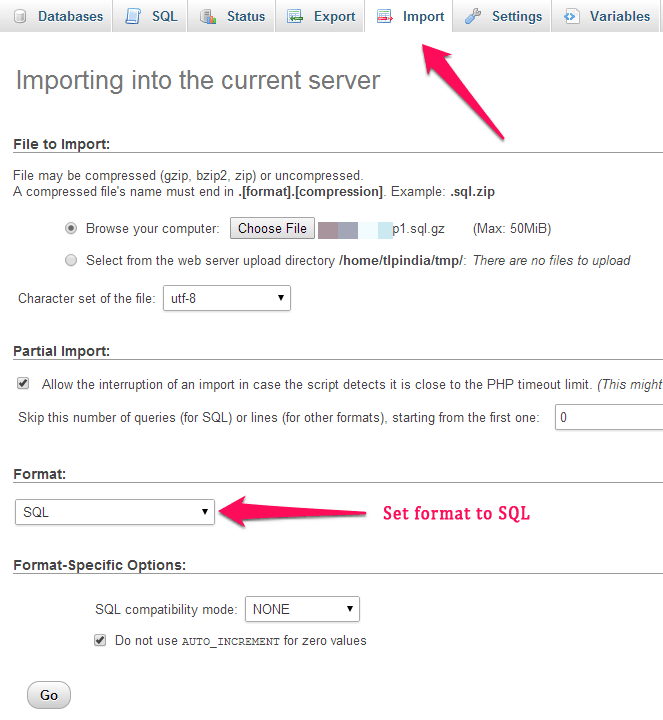
Open up phpMyAdmin on your new control panel.
- d) Select your new database.
- e) Then click on ‘Import‘ on the top menu bar.
- f) Set Format to SQL.
- g) Find the exported database on your PC, and import that.
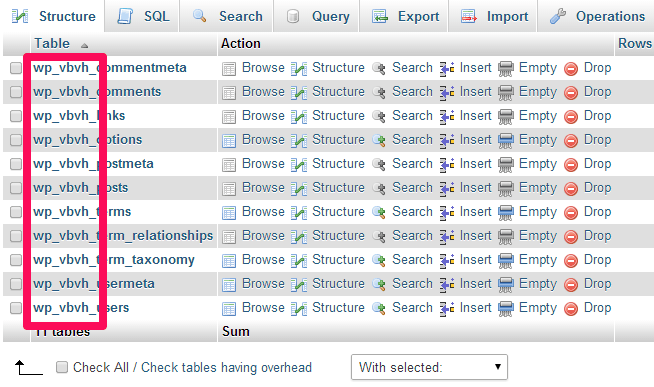
Now click on ‘Structure‘ on the phpMyAdmin menu bar and make a note of the database prefix, including any final underscore.
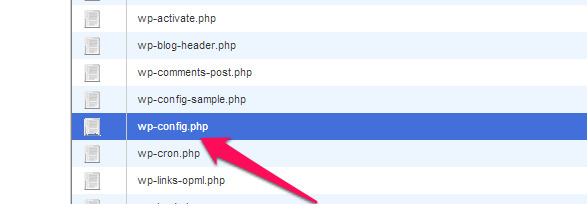
Now, go to file manager on your cPanel. Navigate to wp-config.php and open the file using the text editor on the menu bar. If you have not used exactly the same database name, user and password as in your original database, then you must now replace the old with the new data in your wp-config file. To do that:
Change the DB_NAME, DB_USER and DB_PASSWORD to your new settings.
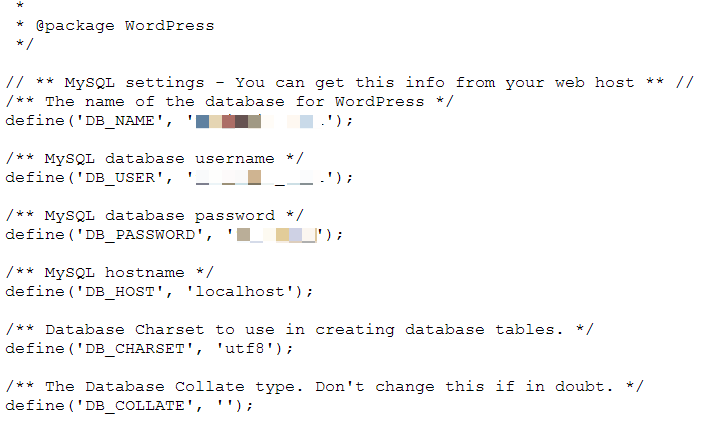
Now look for ‘$table_prefix‘ in the same wp-config file and change it to the database prefix you noted above. The line should now read $table-prefix = ‘your prefix’; you can now save the wp-config.php file.

That’s the database now migrated correctly.
Note: The cPanel backup link also offers a full site backup. You should make a full site backup once your blog is working well on your new host, and you are ready to cancel your old hosting service. You will need this if you want to transfer your entire domain over. Make sure, however, that the domains and files you subsequently upload are not connected with your blog, or you might have problems.
Using the Hosts File in Windows
The objective is to direct your computer to your new web hosting service when you access your blog. You can then make sure it is working properly on the new host before making the switch permanent. If not, then you will be able to correct the problem while your visitors can still access your blog on your old host.
To achieve this you have to update the ‘Hosts’ file in Windows with the IP address of your new server. Here’s how:
- a) Click on ‘Start‘ or on the bottom left windows icon, or press the Windows key on your keypad. Type ‘notepad‘ into the ‘Start Search‘ window and locate ‘Notepad’ in the drop-down list. Right click on ‘Notepad’ and select ‘Run as administrator‘.
- b) Click File->Open then set file Type to ‘All Files‘.
- c) Then open the ‘Hosts‘ file from the following path:
C: -> Windows -> System 32 -> drivers -> etc -> Hosts
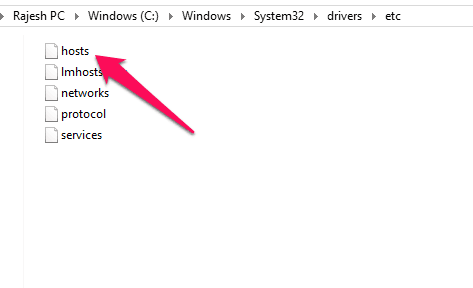
- d) Add your new server’s (your new web host’s) IP address and your domain name to the Hosts file, for example, if your blog is techlila.com, and you are switching your web host from HostGator to Bluehost:
67.20.90.135 techlila.com
(67.20.90.135 is Bluehost’s IP address). Just add that line to the bottom of the file. Your computer will then direct you to your blog on your new host so you can be sure it is working before closing it down on your old host. Only you are sent there by your computer, because the change to your ‘hosts’ file only applies to your computer. Your readers will still see your blog on your current web host.

Alternative Method for Hosts File:
If you are not confident of using the method above, there is an alternative way of adding this line to your ‘hosts’ file if you use Firefox as your browser. There is an add-On known as SwitchHost which will do it for you. You can find out how to install that add-on and use it on our blog post here: SwitchHost Add-On.
Method 2: Using Hosting-Transfer.php (Professional Blogs)
The above method is fairly easy to use, but even easier is to use the hosting-transfer.php, particularly if you have a lot of data to transfer. It would take forever for professional bloggers to transfer the files needed to run a large blog. It is this that we shall focus on now.
Definitions
To make this easier to follow, we shall refer to these definitions:
- Existing web host: HostGator.
- New web host: Bluehost.
- Existing blog: TechLila-HG.com
- New blog: TechLila-BH.com
- Add-on domain: AnyDomain.com
Let’s assume throughout that you are switching from HostGator to Bluehost, and the blog is TechLila.com. TechLila-BH will be the blog on Bluehost while just TechLila-HG will be the original on HostGator.
Not many people are aware of this method, even though it is the simplest and quickest method of transferring or copying large WordPress blog files from one web host to another. It can also be used for small blogs, and it involves less work than any of the options in the above Method 1. It involves:
- a) Creating a zip file of your wp-content file.
- b) Backing up your MySQL database as in ‘c’ above.
- c) Transferring your original blog’s wp-content data to an add-on domain (AnyDomain.com) using move options provided in cPanel.
- d) Uploading a script to the new web host (Techlila-BH.com), and then
- e) Using that script to transfer the data from the add-on domain to the main domain on your new web host (Techlila-BH).
- f) Restore your database from your PC to your new host – techlila-BH.com.
Add-on Domains
An add-on domain is a separate domain name hosted by your current or new web hosting service which we are referring to as AnyDomain.com. You must purchase the domain name, and then point it to your web hosting service. A domain name purchase is not a great expenditure, and you can use the domain as part of your business if you wish. Most internet marketers use more than one domain, and you can use an existing add-on domain if you have one.
Not all web hosting services offer add-on domains, and if that applies to you skip this section and check out the next, which covers your case. However, if your existing blog is hosted by HostGator (Baby plan) or Bluehost, then you are permitted unlimited add-on domains.
For our purpose here, your add-on domain is AddondomainA.com. Here are the techniques to use if your existing host allows add-on domains.
Case 1. Add-on Domain (AddondomainA.com) on Your Old (HostGator) Server
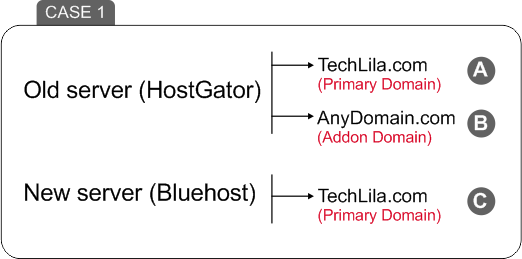
You want to move Techlila-HG.com from HostGator to Bluehost.
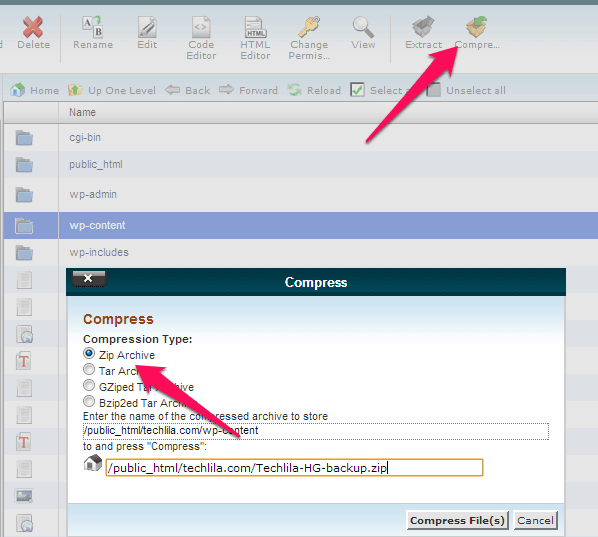
1. Create a zip file of your existing wp-content file. Pop up window will open, choose Compression Type as ‘Zip Archive‘. You can use any name, but we are using Techlila-HG-backup.zip
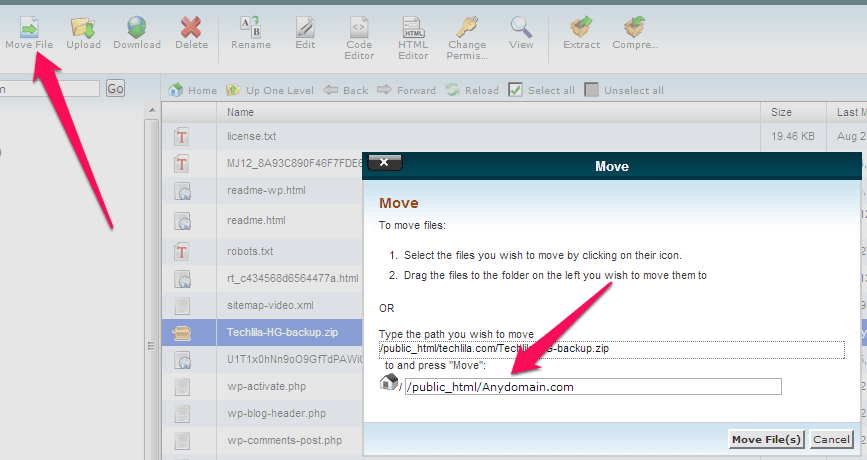
2. Move the Techlila-HG-backup.zip to your add-on domain AddondomainA.com. You do not have to install WordPress on this domain – simply use ‘Move File’ feature of cPanel:
3. Upload the file, hosting-transfer.php (right click and click on save as), to the new host (Bluehost). You can either use upload feature provided in cPanel or use FTP program. Now open the URL: yoursite.com/hosting-transfer.php. This will open to provide a number of fields to be filled in:
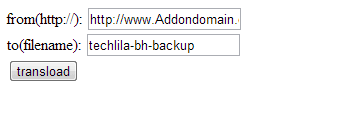
Do so like this with only the final ‘from’ and ‘to’:
from (http://): http://www.AddondomainA.com/Techlila-HG-backup.zip
to (filename): techlila-bh-backup
In ‘to (filename)’ field you can use any name as per your choice, to save TechLila-HG-backup.zip file on your new web host.
Click on ‘transload‘ and your backup file will be transferred to your new web host’s root directory. Unzip this. Then:
- a) Backup your MySQL database as in Method 1.
- b) Create a MySQL database from the Control Panel on your new host.
- c) Assign all privileges (777).
- d) Import the database using phpMyAdmin (use the saved database on your PC). Then edit the wp-config file to make sure that the database name, user name and password are the same as per your details. Then you are done!
Case 2. Add-On Domain on Your New Server
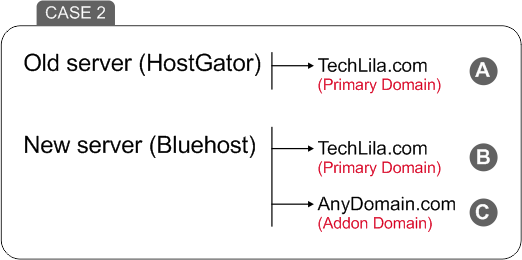
Note: In this case don’t edit your host file before transferring the backup file to new server.
Sometimes your existing web hosting service might not allow add-on domains. If this is the case, then you must use an add-on domain on your new web host. So:
As explained earlier, you will already have installed WordPress and created a database on your new host website Techlila-BH.com. Now you must:
- 1. Create an add-on domain on your new web hosting service, rather than on your original site. Call it what you want, our example being AddondomainB.com.
- 2. Create a backup file of wp-content folder in old server (HostGator) as shown in 1 above.
- 3. Now upload hosting-trasnfer.php file in AddondomainB.com and open the URL http://AddondomainB.com/hosting-transfer.php, and use the following details:
from (http://): https://www.techlila.com/Techlila-HG-backup.zip
to (filename): techlila-bh-backup
4. Now use the ‘Move file’ feature in cPanel and move the backup file to techlilla.com
5. Now follow the same database backup and restore process as shown above.
Check out you blog on your new web hosting service, and make sure everything works as it should.
Update Nameservers
Once everything is operating to your satisfaction, point your DNS to the new web host. Your hosting service will provide you with the necessary details to do this.
Finally: If you experience any 404 error issues with your internal links, then save you permalinks from your Dashboard.
Benefits of Migrating a WordPress Blog Without Downtime
The benefits of migrating your WordPress blog without downtime are obvious. If there are issues, then these methods enable you to resolve these issues while your blog is still running as normal on you regular host. You lose nothing, while you are able to fine-tune the same blog on another web hosting service. If you’re facing any problems or have any doubt then use the comment form provided below. Also you can hire us to do this for you, we’ll charge $50-$150 depending on the size of your files and database.


Leave a comment
Have something to say about this article? Add your comment and start the discussion.