Have you ever found yourself in a virtual meeting or phone call, only to realize that the person on the other end can’t hear you clearly? It can be frustrating, especially when you’re using a high-quality device like AirPods.
But don’t worry; this is a common issue that can be fixed with a few simple tips and tricks. Below, we’ll explore the reasons behind poor AirPods mic quality and share some easy solutions to improve audio clarity.
Why Can’t People Hear Me on My AirPods?
If people can’t hear you on your AirPods, you need to clean the AirPods microphone, update their firmware, and ensure they’re set as the primary microphone. If that doesn’t work, you can disable automatic ear detection and reset the network settings. If nothing seems to work, resetting your AirPods can help resolve the issue.
Reasons Why People Can’t Hear Me on My AirPods
Here’s a list of potential reasons why people may not be able to hear you when you’re using AirPods:
- Microphone settings: The microphone on your AirPods may not be properly enabled or configured.
- Connectivity issues: Poor Bluetooth connectivity between your AirPods and your device can impact communication.
- Low battery: If the battery level of your AirPods is low, it can affect the microphone’s functionality.
- Dirt or debris: The microphone opening on your AirPods may be clogged with dirt, debris, or earwax.
- Software issues: Software glitches or bugs in your device’s operating system can affect the performance of the AirPods’ microphone.
- Hardware problems: There might be a hardware issue with your AirPods that is causing the issue, like damaged microphones.
Once you identify the potential cause of “why can’t people hear me on my AirPods“, you can take the necessary steps to troubleshoot the issue and ensure that others can hear you properly when you’re using your AirPods.
Related Reading: Why Are My AirPods So Quiet? (Make It LOUDER)
What to Do When People Can’t Hear Me on AirPods?
If you’re experiencing microphone issues with AirPods, here are some general troubleshooting steps you can try to fix the problem:
1. Set the AirPods as the Primary Microphone
In many situations, people may not be able to hear you on your AirPods because your device is using a different microphone instead of your AirPods’ microphone during a call.
To fix this, you can easily change the audio settings while you’re on a call. Go to the call interface, select the ‘Audio’ option, and choose your AirPods as the preferred audio output.
2. Switch AirPod Microphones
AirPods have four microphones in total, two in each earbud. These microphones switch between the right and left earphones to equalize the audio input. However, if one or both microphones are damaged, it can result in poor audio quality during calls.
You can change your AirPods’ settings to use only one earbud as the microphone and check if the issue persists. Here’s how you can do it:
- Go to Settings on your device.
- Select Bluetooth.
- Find your AirPods in the list and tap the “i” icon next to them.
- Choose the Microphone option.
- From there, you can select which earbud (left or right) picks up audio during calls.
- Try using both sides separately in different calls to identify if there’s a problem with either of them.
You may find that using a single earbud microphone instead of both fixes the problem.
Related Reading: Left AirPod Not Working Even After Reset? (PROVEN Fix!)
3. Clean AirPods’ Microphones
If you’re wondering why people can’t hear me on my AirPods, it’s possible that the microphones on your AirPods are obstructed by debris. The original AirPods and AirPods Pro have microphones located at the top and bottom of each earbud, and these microphones work together to capture audio during calls or recordings.
When the microphones are blocked or clogged, it can significantly impact the quality of the sound input. This means that even if one microphone is obstructed, it can affect the overall audio input capabilities of your AirPods.

To resolve this issue, follow the below steps:
- Gently clean the microphones using a cotton bud, a toothbrush, or a soft, lint-free cloth.
- Carefully remove any dust, dirt, or loose debris that may have accumulated on or around the microphone openings.
Taking this step can help restore the proper functioning of the microphones and improve the audio quality during calls or recordings. If the issue persists, you may need to explore the below troubleshooting steps.
4. Restart Your Phone or Device
Sometimes, turning your device off and on again can help resolve issues with electronic equipment. This process, known as power cycling, can eliminate any temporary errors. Try restarting your iPhone or Android device to see if it improves audio quality or resolves any issues.
5. Establish a Stable Bluetooth Connection
AirPods use Bluetooth technology to establish a connection with your device. If the connection is weak or poor, it can affect the microphone and make it difficult for others to hear you.
This situation may occur when there is a significant distance between your AirPods and your device or when multiple devices are paired to the same Bluetooth network.
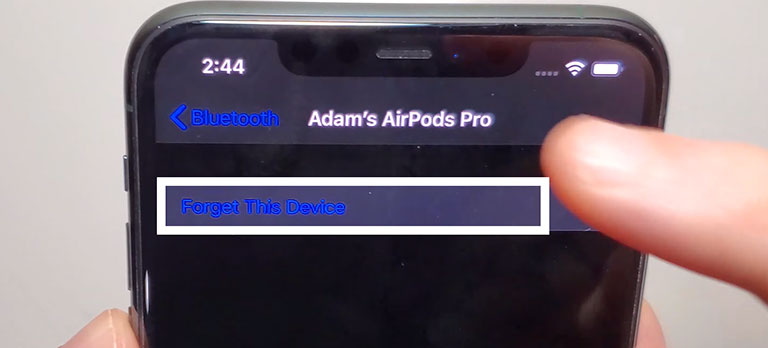
To resolve this issue, try getting closer to your phone or unpairing other Bluetooth devices that might be causing interference with your AirPods’ connection. Doing so can improve the connection and ensure that others can hear you properly.
Related Reading: AirPods Connected But No Sound? (Try These FIXES!)
6. Ensure All Devices Are Fully Charged
If your AirPods have a low battery, their performance can be significantly affected. Insufficient battery power can lead to limited audio detection, making it difficult for others to hear you during calls.
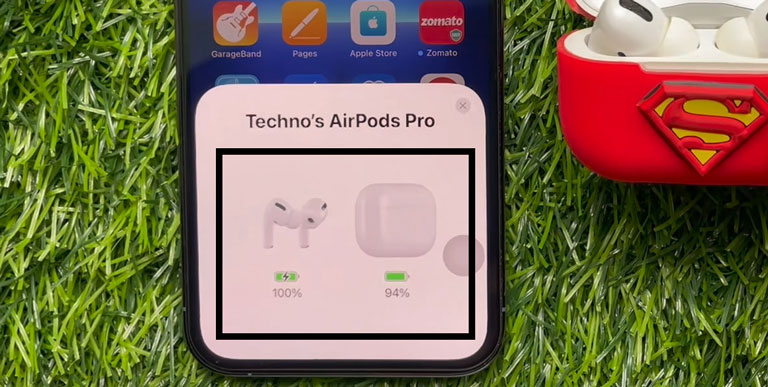
To resolve this, make sure to fully charge your AirPods before making or receiving calls, as it can help ensure proper microphone functionality.
7. Turn Off Automatic Ear Detection
Apple’s Automatic Ear Detection feature is designed to detect whether your AirPods are in your ears or not. It can be helpful, but sometimes it may not work as intended. In some cases, it may prevent your AirPods from becoming the primary audio source.
So, it’s recommended to turn off the automatic ear detection feature and see if it resolves the issue. Here’s how:
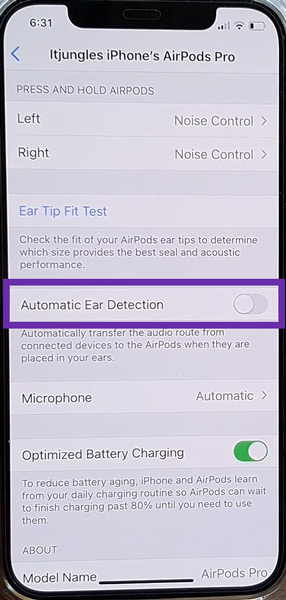
- Open your device’s Settings.
- Go to the Bluetooth settings.
- Find and select your AirPods from the list of connected devices.
- Look for the small “i” icon next to your AirPods and tap on it.
- Locate the option for “Automatic Ear Detection” and toggle it off.
Hopefully, this will resolve any bugs or glitches that may affect your AirPods’ performance during calls. If it doesn’t, move on to the following method.
Related Reading: How to Fix if One AirPod is Louder Than the Other (EASY Fix!)
8. Update the Software for All Devices
Software updates are essential to keep your device running smoothly and maintain a stable Bluetooth connection. So, make sure your device’s software is up-to-date. Here’s how:
For Android Users:
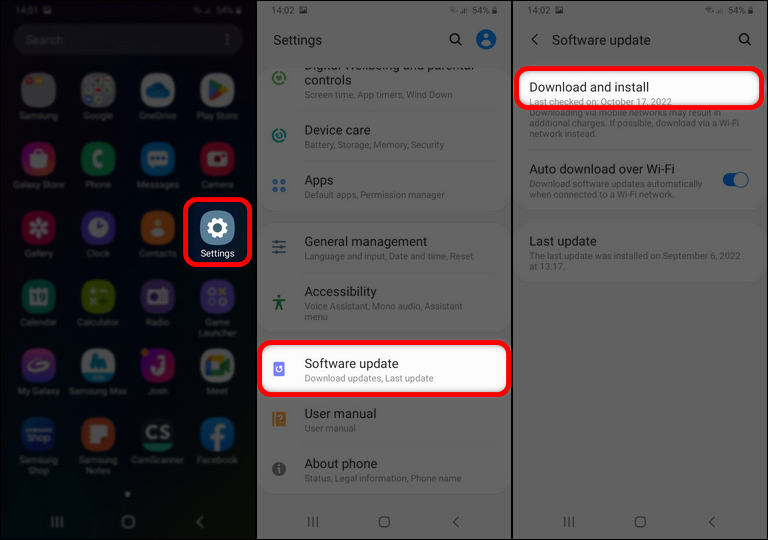
- Go to Settings > Software Update.
- Tap on Check for updates.
If your device is up to date, it will say, “Current software is up to date.” If an update is available, you’ll be prompted with “Update available.”
For iPhone Users:
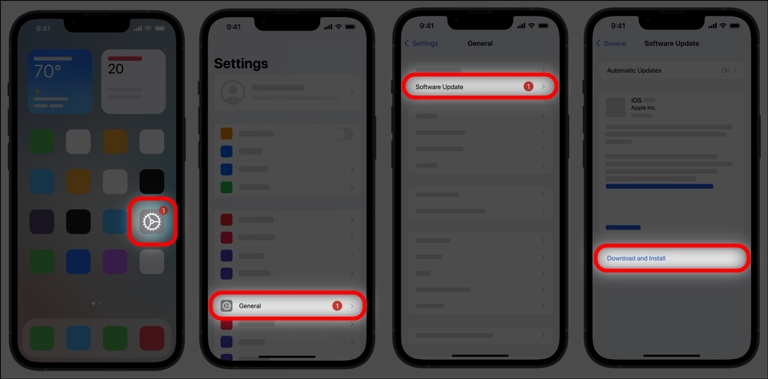
- Open Settings > General > Software Update.
Your iPhone will show the current software version, and you’ll see if an update is available.
Here’s a video on how to update your AirPods to the latest firmware.
9. Reset Network Settings
Sometimes, resetting the network settings can help resolve the issue. This process will clear all the saved Wi-Fi and Bluetooth connections on your device.
To reset network settings on an Android device:

- Open the Settings app.
- Look for options like “General” or “System” (depending on your device).
- Choose “Reset” or “Reset options“.
- Look for the option to Reset Network Settings and select it.
To reset network settings on iPhone:
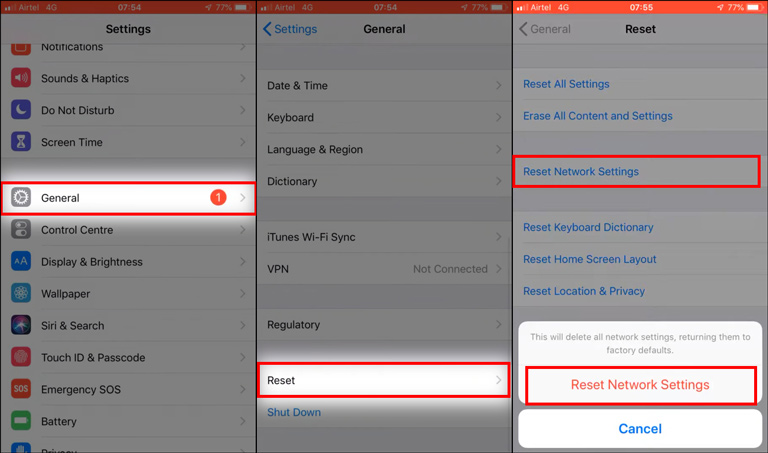
- Go to Settings.
- Select General.
- Scroll down and tap on Transfer or Reset iPhone.
- Click on Reset.
- Choose Reset Network Settings.
After resetting the network settings, you must reconnect to your Wi-Fi network and pair your AirPods again on your device.
10. Disable Sound Check
The sound check feature on Apple devices allows users to adjust the volume of music to make it consistent. However, it can also affect the audio during calls. It’s best to disable this feature and see if it resolves the issue.
To turn off Sound Check on iPhone:
- Open Settings.
- Scroll down and tap on Music.
- Make sure the Sound Check option is in the off position.
11. Reset Your AirPods
If none of the above troubleshooting steps works, performing a full reset of AirPods can help resolve the microphone issues. This will force-update your AirPods and fix any bugs that are causing the problem.
Follow the below steps to reset your AirPods:
- First, place your AirPods in the charging case and close it.
- Wait for about a minute.
- Open the lid of the charging case.
- Put your AirPods in your ears and connect them to your iPhone.
- Go to Settings and open the Bluetooth menu.
- Click on the “i” icon next to your AirPods’ name and choose the “Forget this device” option.
- Keep the case open, press the Setup button on the back, and hold it for 30 seconds.
- The LED light on the case will flash amber and then turn white.
- Re-pair AirPods with your phone again.
12. Contact Apple Support
If people still can’t hear you on your AirPods, there’s likely a problem with your AirPods. If you frequently drop your AirPods, it could have caused damage to the microphones.
In such cases, it is recommended to reach out to Apple Support or schedule an appointment at the nearest Apple store for repairs or a replacement of the AirPods. They will be able to assist you further in resolving the problem.
Related Reading: How to Find AirPods When Dead or Offline? (REALLY Possible!)
Frequently Asked Questions

Why Is Only One AirPod Mic Working?
One AirPod mic may not work due to a hardware issue or a software glitch. It’s recommended to check the microphone settings to see if they are set to use both mics. If that doesn’t work, clean the AirPods, reset them, and update the firmware. If the issue persists, contact Apple Support for further assistance.
How Can I Improve My AirPods Mic Quality?
You can improve the mic quality of your AirPods by cleaning the microphone, adjusting the microphone settings on your iPhone, and avoiding windy or noisy environments. You can also check for software updates and enable the noise-cancellation feature for an optimal talking experience.
The Bottom Line
There can be various reasons why people might not be able to hear you when using your AirPods. It could be due to microphone settings, connectivity issues, a low battery, dirt or debris blocking the microphone, software glitches, or even hardware problems. However, by following the troubleshooting steps outlined below:
- Set the AirPods as the Primary Microphone
- Switch AirPod Microphones
- Clean AirPods’ Microphones
- Restart Your Phone or Device
- Establish a Stable Bluetooth Connection
- Ensure All Devices Are Fully Charged
- Turn Off Automatic Ear Detection
- Update the Software for All Devices
- Reset Network Settings
- Disable Sound Check
- Reset Your AirPods
- Contact Apple Support
By taking these steps, you’ll increase your chances of resolving the problem and enjoying clear communication with your AirPods again.
Hopefully, you now know the answer to “Why can’t people hear me on my AirPods” and how to resolve it. If you have any questions about AirPods, feel free to comment below! We’d be happy to help.

Leave a comment
Have something to say about this article? Add your comment and start the discussion.