Photos are our go-to way to capture our life’s memorable and heartfelt moments. The most exciting moments in our lives are short and usually spur-of-the-moment actions. Capturing these moments on screen can feel great, but there is also a great chance that photos taken in excitement might end up being blurry. So, the question is, what to do with those photos? You can’t go back in time to retake the photos. The thing you need to do now is to find out how to fix blurry pictures.
You don’t need to panic or get depressed as the process of how to repair photo is a few clicks away on Wondershare Repairit. Continue to read the article to find out the detailed process of this photo repair tool.
Part 1: Major Reasons Behind Photos Getting Blurred
There are a lot of reasons why photos get blurred. It could range from wrong camera settings to unexpected target movement to low-quality or unclean camera lenses. The primary reasons which can cause photo blurriness are discussed in detail below:
1. Shutter Problems
The first reason when it comes to causing blurry photos is “too slow shutter speed.” You should always ensure that your camera’s shutter speed complements your lens’s focal length. For example, if you use a 200mm camera lens, the shutter speed should be 1/200s. Plus, you might think you can hold still for half a second but it is very hard. Nowadays, most cameras come with stabilization technology which can help you greatly.
Most cameras comes with a shutter speed range of 1/500s to 1/60s. Do not try to handhold a camera to take photos with a shutter speed of less than 1/60s, as you won’t be able to hold the camera steady.
2. Not Using Tripod
One way to counter the camera shake is using a tripod. There are a lot of situations where you can’t go with a faster shutter speed, and handholding your camera can be shaky; you can use a tripod there. Make sure that the tripod is well-balanced, sturdy, and well-secured. If you are taking pictures on a bridge, you need to take account of the movement of people and vehicles, as the slightest disturbance can cause a camera to shake.
When taking camera pictures using a tripod, try to take pictures using a remote cable release or a timer. The camera can shake with the slightest movement of you pressing the shutter button. Keep the auto stabilization feature turned off, as it can blur the photos when using a tripod. When using a DSLR, you must lock up the mirror to avoid vibrations.
Problem With Focus
One of the trickiest things when using a camera is to set the right focus. It can be a big problem if the focus isn’t set up in the right place and can cause the image to blur. Nowadays, cameras come with the outstanding feature of autofocus. While leaving a few scenarios aside, it is a great feature for most situations you’ll face. When it comes to moving targets, autofocus is a great tool. When using autofocus, make sure you are using the correct mode of autofocus. There are three mods available, Single-Shot Autofocus (AF-S) can be used for still objects, Continuous Autofocus (AF-C) can be used for moving subjects, and Automatic Autofocus (AF-A) is the default mode.
There are also times when you need to use manual focus, situations in which autofocus can be counterproductive. One such situation is when you are using a tripod. In this situation, take autofocus off and set manual focus to take clear pictures.
4. Wrong Camera Holding Posture
The big problem when taking photos by handholding a camera is that most of the time, our techniques of holding the camera are wrong. These wrong techniques can result in making a lot of captured images blur. To correct your camera holding posture, study some tips online or watch professional photographers and practice those techniques. You can follow this photographer’s position as an example.
Stabilize your feet first, but they should be slightly apart, with one taken forward with establishing it to maintain your left-to-right and back-to-front balance. The left hand should be used for holding the lens from underneath. The right hand should be used for grip and softly pressing the shutter button. Hold the camera close to your face with your elbows near your chest. This technique can help you a lot in taking great pictures.
Part 2: How to Repair Blurred Photos Online From Any Device?
After going through why your photos can get blurred, the question is what you can do to repair it. A great tool is available online to repair your pictures within minutes. Repairit – Online Photo Repair is a fantastic tool that can fix any type of damaged photo. Aside from repairing blurred images, it can also fix photos with grey areas, pixilated photos, and corrupt photos that can’t be opened. It can even repair severely damaged photos.
It supports many photo formats like JPG, CR2, NEF, JPEG, JPG, CR3, NRW, etc. The data is transferred using 2048-bit encryption and is permanently deleted from servers after 3 hours, so there is no need to worry about data security. The interface is simple and user-friendly, and it can repair photos from all types of devices. You need to go through these steps to repair your photos:
Step 1: Open the Tool and Upload Your Photos
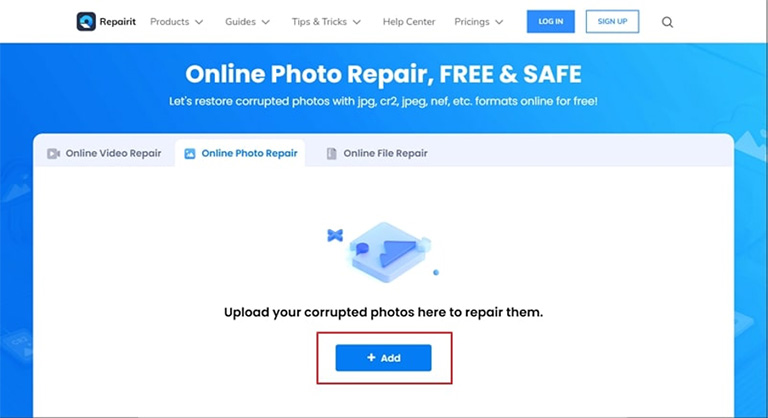
Open your browser and go to the Repairit website and select Online Photo Repair. Now upload your blurred photos here by either clicking on “+Add” and selecting pictures or using the drag and drop method.
Step 2: Start the Repair Process
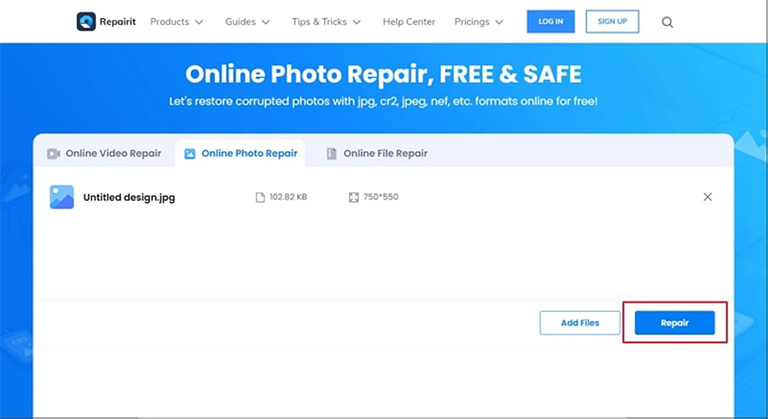
Once the blurred photos have been uploaded, you can see the details on the screen. It will show each file with added details like size and pixels. Now press “Repair” to start the process; it will take a few minutes to complete. Once completed, it will show you a notification with the result.
Step 3: Advanced Photo Repair
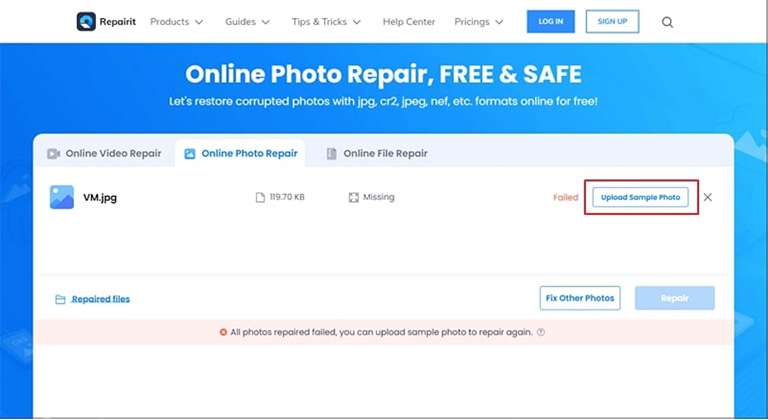
If the repair process fails, it means your files are severely damaged, and you need to run the advanced photo repair process. You need to provide a sample picture in it, ideally of the same format and taken by the same device as a blurred photo. Once you have uploaded the sample picture, click “Repair” again to start the repairing process and wait for a few moments to complete it.
Step 4: Preview and Download the Repaired Files
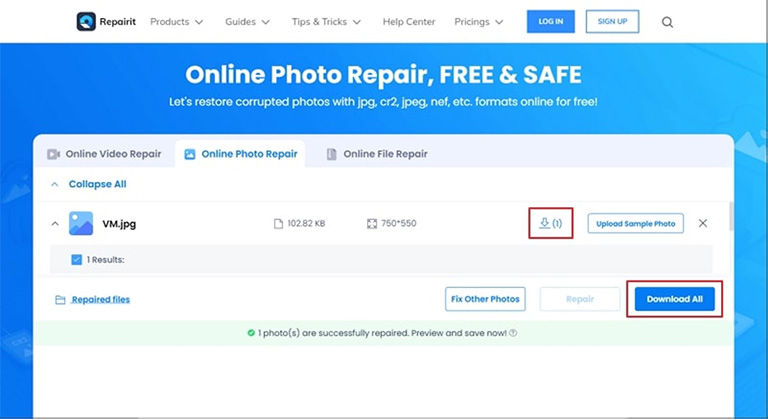
Once files have been repaired, you can check the results to preview the files. After being satisfied with the final results, you can download the pictures to your computer using the “Download All” button or pressing the “Download” icon in front of each file.
Part 3: Repairit – Photo Repair: Features and Benefits with Process of Repairing Photos
The Repairit – Online Photo Repair tool only allows you to repair up to 500MB of photos or 100 photos per day. If you have many more photos than 100 or the photos’ total size is larger than 500MB, you should go for the Repairit desktop app for your computer. You can repair pictures on the desktop app without data size or max number limits. You can select your blurred photos in batches to repair, irrespective of their formats.
Like the Repairit – Online Photo Repair tool, its desktop versions also offer features like preview, advanced repair, support for over 17 photo formats, etc. It also has a user-friendly interface and a short and quick repair process. These are the 3 steps you need to do to repair your blurred photos:
Step 1: Select the Photo Repair Mode
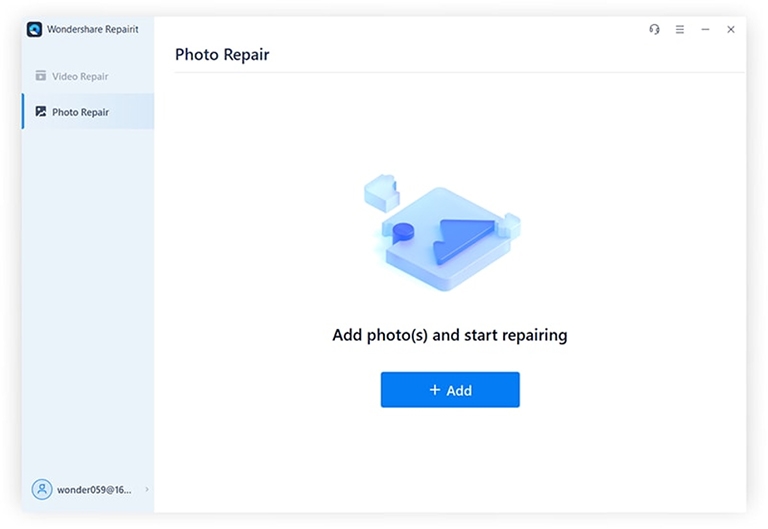
Run the Repairit app on your system and select the “Photo Repair” module from the panel on the left side. You can add damaged photos by tapping on the “+Add” button. It will open a browsing window, locate where your blurred images are, and select them.
Step 2: Start the Photo Repair Process
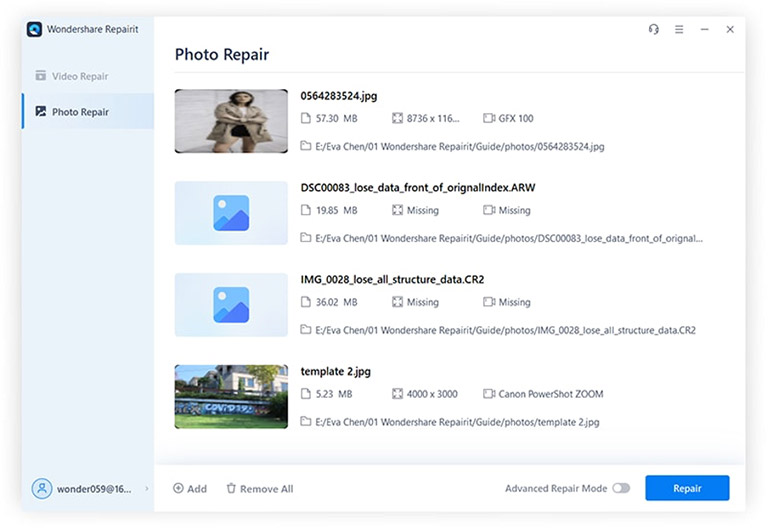
You can see your photos with details after they are loaded onto the program. You can see details such as file size, resolution, address, and device name. Now press “Repair” to start the photo repair process. If the simple repair process doesn’t work, you can use the advanced repair process for your files by providing sample pictures.
Step 3: Preview and Save the Photos
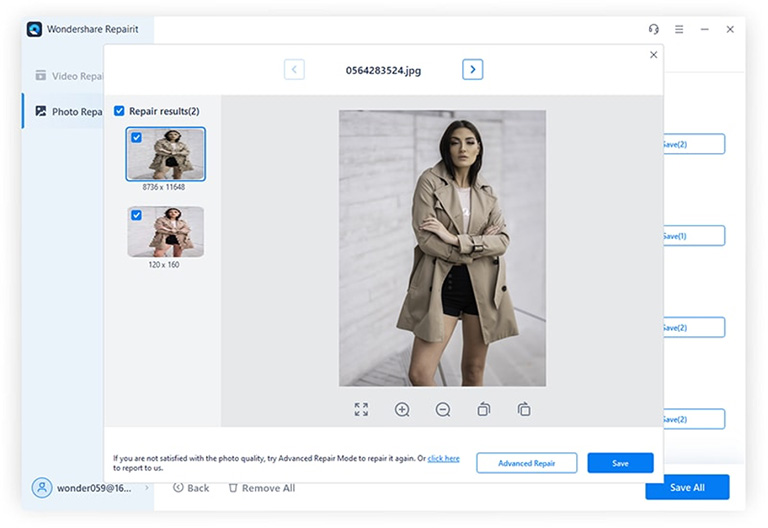
When the repair process has been completed, you can click on the “Preview” button in front of each photo. After ensuring that your photos have been repaired, you can save these files using the “Save” or “Save all” button. Pressing it will open a window where you need to provide a location to save files. Provide a different location than where the files were already previously located.
The Bottom Line
Blurred photos can be heartbreaking as it could mean that you might not be able to cherish that specific moment. The situation can also get embarrassing if your friends or family ask you to take photos at an event or tour, and the photos end up being blurred. It is also possible that the blurred images you took were essential for your work life. Luckily Repairit – Photo Repair tool can be your savior in all these situations.


Leave a comment
Have something to say about this article? Add your comment and start the discussion.