It is difficult to work on your computer when a specific process is consuming all CPU resources, right? It has also been why people are frustrated with the host process for setting synchronization using high CPU errors. As you can guess from the name, the error appears when SettingSyncHost.exe consumes way too many CPU resources than it normally should. Even though the error is frustrating, you do not need much tech expertise to solve the problem. However, you may be worried about where to start. It is why we have created a fully-fledged guide to fix the host process for Setting Synchronization high CPU usage error in this article.
Table of Contents
What Does the Host Process for Setting Synchronization High CPU Usage Mean?
The error simply means that the SettingSyncHost.exe process is consuming more CPU resources than it shall normally do. In case you are wondering, SettingSyncHost.exe is not a virus that has managed to enter your Windows PC.
On the other hand, it is one of the most useful processes on Windows. Therefore, removing or disabling the process is out of the question. If you remove/disable the process, you may end up tampering with the Windows User Experience system. Therefore, you have to understand why the process is acting this way.
This particular error, where SettingSyncHost.exe is seen consuming a lot of resources, was noticed by many teams at Microsoft. As it goes without saying, multiple solutions were made available. In this article, we have mentioned three of the best fixes we could find for the issue.
Now that you know the basic understanding of why you see the SettingSyncHost.exe high CPU usage error, shall we move on to the solutions?
Methods to Fix Host Process for Setting Synchronization (SettingSyncHost.exe) High CPU Usage
Method #1 Update Windows OS
As we said earlier, the host process for setting synchronization using high CPU error may occur due to some issues on the Windows 10 or Windows 11 OS. Fortunately, Microsoft was quick enough to understand the problem and roll out some solutions. And the best part?
You can access this easy fix by simply updating your Windows OS via the Windows Update module. It is also one of the reasons why we always encourage our readers to update their PCs automatically. In this way, you can get rid of errors and other issues with ease. You will also get additional features.
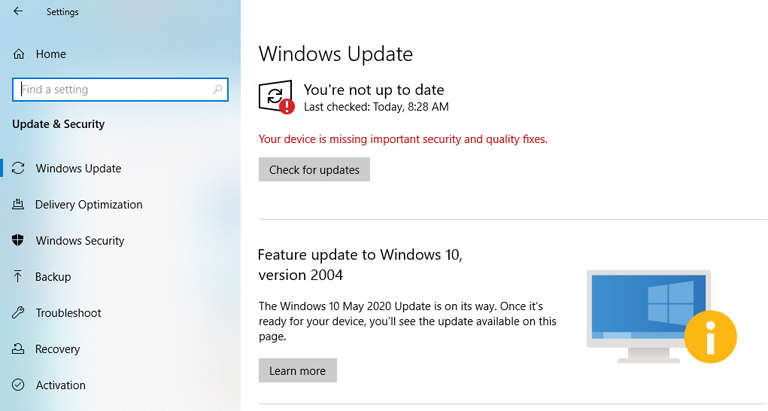
Here is how you can update your PC to the latest version via Windows Update.
- Go to Start Menu and search for Windows Updates

- Open the Windows Update page on your PC
- Now, click on the Check for updates button on the top part
- Now, wait while the WU module will search for and download available updates
- You can also choose the updates you want to install
- You may have to restart the PC to install the downloaded updates
Once you have correctly installed the Windows Update, it solves the host process for setting synchronization using high CPU error without any side effects. However, if you still see that SettingSyncHost.exe is using lots of CPU resources, you can try the following method.
Method #2 Add Ownership for a Registry Key in Windows Registry
Windows Registry is one of the most powerful things within the Windows OS. Even the slightest changes in registry keys can cause frustrating errors on your computer. The host process for setting synchronization using high CPU error is not an exception, either. Therefore, you can try a solution that involves some edits in the Windows registry.
Here is what you should do in Windows Registry to fix the error we have been talking about.
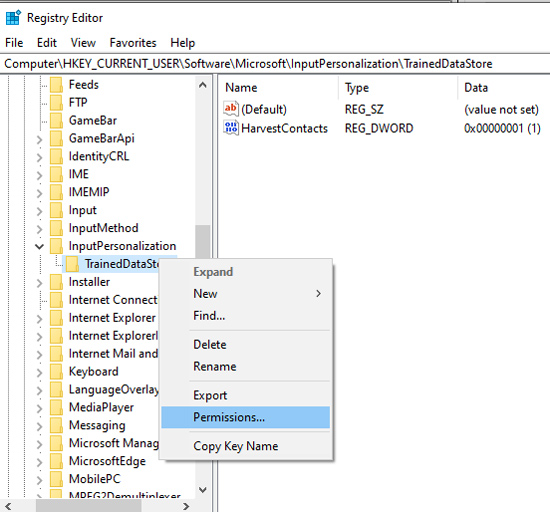
- Open RegEdit on Windows through the Run command

- Once you have opened Registry Editor, navigate to the following path:
HKEY_CURRENT_USER\Software\Microsoft\InputPersonalization\TrainedDataStore.
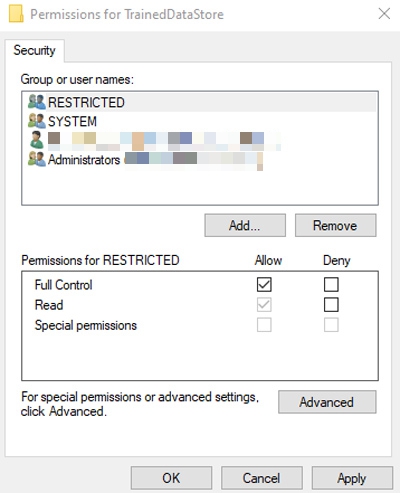
- Once you are there, right-click on the TrainedDataStore folder and choose Permissions

- On the upcoming window, choose the option for Full Control

- You can now Apply the changes and close the Windows Registry.
That’s it; you have provided full access to the required agents. It must be able to get rid of the host process for setting synchronization using high CPU error on Windows 10 or 11.
Method #3 Disable SettingSync
If the methods we have covered so far do not work, you can try something else. If you have enabled a firewall or antivirus program, you can add SettingSyncHost.exe to the list of disabled programs. Of course, you will have to compromise the Windows functionalities you get. For instance, the syncing options on your PC may become askew.
As we said earlier, SettingSyncHost.exe is an important part of the Windows system. Disabling it may tamper with the UI/UX experience. So, we recommend this method only as a temporary solution. For instance, if it is impossible to live without the benefits of SettingSyncHost.exe, you can put it as an exemption. By the way, while you are at it, make sure that your antivirus is not behaving erratically.
Other Solutions
Other solutions for the problem include some extreme measures. For instance, you can reset the PC to see if the problem persists. Similarly, if nothing else works, you can reinstall Windows on the PC. Provided that you run Windows Updates after installing the Windows OS, you should have a great PC experience with no errors. In particular, you can stay away from the host process for setting synchronization using high CPU errors.
Frequently Asked Questions

What is the host process for setting synchronization?
SettingSyncHost.exe is the host process for setting synchronization on your Windows PC. It is a crucial aspect that enables proper syncing and management on your Windows PC.
Do I need a host process for setting synchronization?
Yes, you need a host process for setting synchronization. Otherwise, the setting changes that you make will stay out of synchronization.
Where do I find the host process for setting synchronization?
You can find the host process for setting synchronization by going to the Task Manager under the Processes tab. You have to look for SystemSyncHost.exe.
What is the host process for setting synchronization in Task Manager?
You can find it under the name SystemSyncHost.exe.
Conclusion
We hope you have understood how to deal with the host process for setting synchronization using high CPU in Windows 10 and Windows 11 with ease. While it is a confusing situation, you can get rid of the problem by following the steps we have mentioned earlier.


Leave a comment
Have something to say about this article? Add your comment and start the discussion.