Achieving the perfect PlayStation setup involves more than just a fast DNS or stable WiFi. For many gamers, the tactile feedback of a DualShock 4 controller is what truly creates an immersive experience. While the PS4 controller is celebrated for its reliability and features, the default settings don’t always offer the level of customization every player desires. Whether you are looking to fix a vibration issue or want to force your controller to vibrate continuously for testing or gameplay, this guide covers the exact steps for console and PC users.
Before we jump into the specific steps, let us tell you why you may want to make your PS4 controller vibrate continuously in the first place. As you can guess, it has to do with the overall gaming experience you expect from your PlayStation 4 console.
Benefits of Haptic Feedback: Why Use Controller Vibration?
Having tested dozens of peripherals across various PlayStation generations, I find the DualShock 4 remains a benchmark for tactile feedback. The internal motors are designed to provide nuanced responses that significantly impact gameplay realism. For instance, in titles like Grand Theft Auto 5, the vibration intensity shifts based on engine revs or environmental impacts, providing a layer of sensory data that visual cues alone cannot match. If you have enabled vibrations, you can enjoy a more immersive gaming experience from the device.
For instance, you will get better feedback from the console when your vehicle hits something or when you are using a weapon. Similarly, if you play a title like Fortnite, you get to enjoy the benefits of better feedback. Of course, you can still play your favorite titles on PS4 even if you have disabled vibration on the PlayStation controller, but you really should not do it.
Therefore, an improved gaming experience is a major reason to enable vibration on the PS4 controller. There could also be other reasons, you know. For some people, customizing their gaming experience is a fun idea. By the way, we have to keep in mind that vibration is a battery-consuming affair. If you enable this option, your PS4 controller will run out of battery sooner than you expect it to.
Through hands-on troubleshooting, we have identified three reliable methods to manage these settings, ranging from native console menus to advanced third-party software. While enabling these features enhances immersion, our testing shows that continuous vibration will significantly decrease battery life. We recommend starting with official PS4 settings for stability before moving to third-party tools like DS4Windows or iVibrate for more specialized needs.
Step-by-Step Guide: Enabling Vibration on PS4 and PC
We will look at the different ways to enable vibration on DualShock PlayStation 4 controllers. We will check out the official method first.
Method #1 Using PS4 Settings
Before you go forward with customizing the vibration patterns on the DualShock controller, you have to enable the vibration option. Fortunately, it is a simple affair that you can complete through the Settings page of your PlayStation 4. The steps you have to follow are given below.
- Turn on your PS4 and connect the DualShock PS4 controller to the device
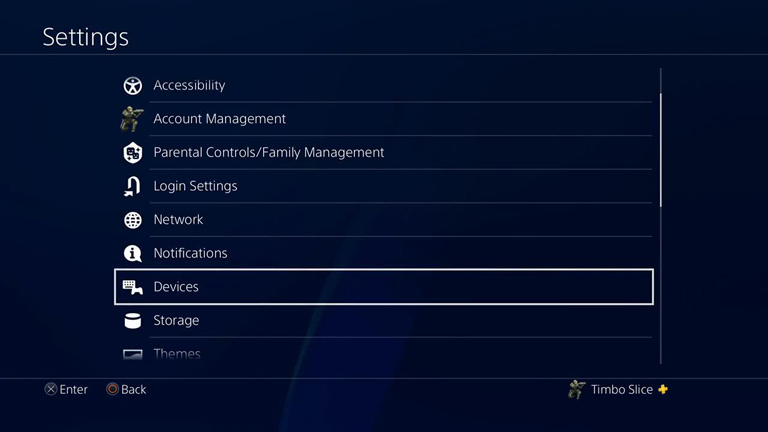
- Now, go to Settings from the homepage and choose ‘Device.’

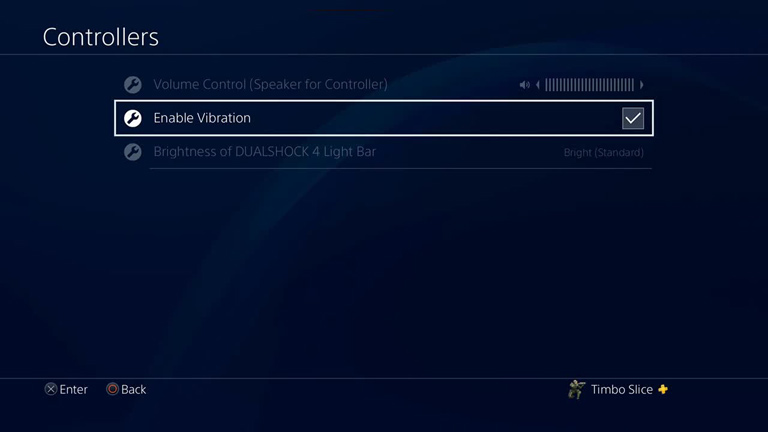
- On the next page, go to ‘Controllers’, and you can click on the option called ‘Enable Vibration.’

That’s it. You have successfully enabled vibration on the PS4 controller. In case you did not know, you have to complete this step before you can make further changes, even if you plan to do it on a PC. By the way, if you ever want to disable vibration on the PS4 controller, you can follow the same set of steps. In the third step, you can uncheck the option and disable vibration.
Here is the limitation, though. You cannot find any additional customization options in the PS4 settings. Of course, the controller would vibrate based on how the game is designed. For instance, if you are playing GTA 5, you can feel vibration based on different interactions with objects and people. On the other hand, if the game is not 100% compatible with the game, you may not have the same experience.
If you are in the second situation, you can think about using a PS4 controller vibration app and making the PS4 controller vibrate continuously.
Method #2 Using the DS4Windows App
As we said earlier, if you are wondering how to make your PS4 controller vibrate nonstop, you have to use a third-party program like DS4Windows. As you can guess, DS4Windows is a utility that lets you use DualShock controllers with Windows PCs. It is something you should install if you want to use the PlayStation controller with your PC.
To use this method, you need to set up a few things on your computer. First and foremost, you need a PC with the basic hardware requirements. In addition, you need to get Rocket League installed on the system. Of course, it should not be a problem since Rocket League is free to play. You also need to download the DS4Windows app from the official website. You can use the same website if you want to download the basic set of drivers to use the PS4 controller on the PC.
Once you have done these things, you can proceed with the steps shown below.
- Open your PC and start the DS4Windows app
- Make sure that you have made all the changes on the Settings page
- In the next step, you will have to connect your PS4 controller to the PC via Bluetooth
- Once you have successfully connected the computer, you can launch Rocket League
- After you have launched the game, you can press the Center button and the Choices for Me button
- Now, use the official USB cable to connect your PS4 controller to the PC
- This step should turn on your PS4 Controller, and it should be able to vibrate nonstop
After you have completed this step, the PS4 controller should be able to vibrate continuously based on the PC. Based on the game you are playing, the intensity of vibration might vary. However, the nature of it would be continuous for the most part. By the way, if you want to customize how the PS5 controller works on your PC, you can download the DS5Windows app for Windows 10 and Windows 11 PCs.
Method #3: Use Third-party Apps Like iVibrate
If you want to go to the next level of making your PS4 controller vibrate nonstop, you can use an external utility like iVibrate. It will make sure that you can override basic settings and make the controller vibrate as long as it is connected to your gaming console. There are a few advantages to using iVibrate on your device, though. For instance, iVibrate is available for Windows, Linux, and macOS. Yes, you heard that right; you can connect your PS4 controller to the Mac and change the way its vibration works.
The steps you have to follow are given below.
- First, you have to download the iVibrate app from the official website. You can download the basic versions for free, but if you need advanced control, you may have to pay a fee.
- Make sure that you install the app on your PC, Mac, or Linux computer while following all the steps shown on the screen. By the way, you will have to provide a number of permissions to the app.
- Once you have installed the app, you can connect the PS4 controller to your computer and make the changes in the app. It should not take more than a few minutes to set things up.
You have to keep in mind that the iVibrate app takes things to the next level. You can control the pattern as well as the intensity of the vibration process with ease. If you ask us, it would be the most customizable option you can find out there. Of course, it comes with a few limitations. For instance, you can use it only if you’ve installed the app and the drivers.
Despite all these, you can count on the iVibrate app to make your PS4 controller vibrate continuously.
By the way, you can use the iVibrate app to control other gamepads as well. For instance, if you want to turn your Xbox Controller into a nonstop vibrating device, you can do it too. However, you may want to think about how these steps will affect the overall battery life of the device. And we recommend enabling the option only if you have connected the PS4 controller to the PlayStation console or PC.
There you have it: the best ways to make the PS4 controller vibrate continuously on a PC. On the PlayStation, though, you cannot set up nonstop vibration. On the other hand, game-based vibration can be set up and used with ease. By the way, it is possible that an external app may be causing your PS4 controller to make a beeping sound without any prior issues. In that case, you can check out the best steps to fix the PS4 beeping issues without fail.
Frequently Asked Questions

How to enable and disable vibration in the PS4 controller?
You can enable and disable vibration in the PS4 controller by going to Settings à Device. On the page, you must be able to find an option to enable vibration. And when you do not want vibration to use up the battery, you can turn it off on the same page. You have to keep in mind that the PS4 settings do not allow room for advanced customization.
Can you make this PS4 vibration continuous?
Yes, you can make the PS4 vibrate continuously, but it cannot be done with the PS4. On the other hand, if you have connected the PS4 controller to your Mac, PC, or Linux, it can be done. To do it, though, you will have to install an app like DS4Windows or iVibrate. You can choose between these two apps based on their overall compatibility and the features you need. For instance, if you need basic controls, DS4Windows is better.
The Bottom Line
We hope you have understood how to make the PS4 controller vibrate continuously. You can also find ways to test vibration on the PS4 controller through the same article. By the way, if you know any other ways to make the PS4 controller vibrate, do let us know through your comments.


DW
Actually vibration can be annoying sometimes
Dinesh
Nice article.. Keep posting more and more.