We’ve all been there: your WiFi bars are full, but your browser won’t load a single page. Whether it’s a “No Internet, Secured” error on Windows or a connectivity glitch on your phone, the disconnect usually happens between your router and your ISP. In this updated 2026 guide, I’ll walk you through 12 field-tested solutions, ranging from simple restarts to advanced DNS flushing, to get you back online in under 5 minutes.
At TechRT, our network troubleshooting guides are built on over a decade of hands-on experience with home and enterprise networking hardware. We don’t just list generic fixes; we’ve tested these steps on the latest WiFi 6/7 routers and modern operating systems including Windows 11 and macOS Sonoma to ensure technical accuracy.
What is worse than finally connecting to your home or office WiFi to find out that you do not have internet access? Unfortunately, this particular error crosses the device boundaries to make it worse. You can encounter WiFi connected but no internet error on Windows, macOS, Android, iOS, and other platforms. Of course, each platform will display the error differently, but the crux remains the same. Yet, you will need a different set of steps to fix this standard WiFi error on these devices.
At TechRT, we rely heavily on WiFi connections. And we have faced this annoying WiFi error countless times. On the bright side, we have mastered all the possible ways to fix the WiFi connected without internet error for good. In this how-to guide, we have explained all possible solutions that will help you fix the said error on Windows, Android, iPhone, and MacBook. Before we do so, we shall check out the possible reasons for the error.
Before you dive into deep settings, perform the “Two-Device Rule.” Try connecting a different device (like your phone) to the same WiFi. If the second device works, the issue is isolated to your computer’s network card or software. If both fail, the problem lies with your router or your Internet Service Provider (ISP). This 30-second test prevents you from wasting time on the wrong fixes.
Two Types of the WiFi Connected but No Internet Error
Before we begin, you should understand that the WiFi is connected but no internet error can appear on two different modes.
- In the first mode, only a single device on your network may show the error. It could be your PC, Mac, smartphone, or tablet PC. You will be able to connect to the network, but internet access may not be available.
- In the second scenario, all devices on your network may show the error message. It means you cannot access the internet through any device on the network. Of course, to confirm if it is the case, you will have to check all devices on your network.
You should clearly understand this part before proceeding further.
Why is My WiFi Connected But No Internet? (Common Reasons)
As you can guess, we have found solutions for both scenarios. As it happens, possible reasons for either type of WiFi connected without internet error are as follows.
- The WiFi adaptor of your PC, Mac, smartphone, or tablet could be facing some issues. It may require troubleshooting or replacement.
- You could be using outdated wireless hardware drivers. It may stop you from accessing the internet even when connected to the network.
- There could be some problems with your wireless router or modem. You can fix it via troubleshooting or replacement.
- Your device could be assigned an incorrect IP address. Problems with IP addresses will prevent your PC or smartphone from internet access.
- There could be problems with the DNS server or DNS configuration. It happens if you have been using custom DNS options.
- There could be some hardware issues with the internet cable. For instance, it may not be connected to the router/modem properly.
- The issue could be with your Internet Service Provider (ISP) as well. In such cases, even if you connect to the network, you may not have internet access.
Now, we shall explore the best solutions to fix these issues.
How to Fix the WiFi Connected but No Internet Error on Single Devices?
First, we will look at the different steps to solve the WiFi is connected but no internet error on PC, Mac, and smartphones. As you can guess, we cannot cover the steps for all platforms. So instead, we shall tell you how to deal with the problem.
1. Restart the Device
You might have already done it. But if you have not, restarting your PC, Mac, Android, or iPhone is the first step of solving the WiFi is connected but no internet error. When you restart the device, it will automatically disconnect from the WiFi network and connect again upon reboot. If you want to fix the WiFi is connected but no internet error on Android, you can toggle the airplane mode as well. It should disconnect the device and reset everything.

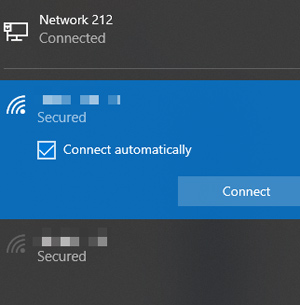
2. Remove and Add the Network
You can follow this method to solve the WiFi is connected but no internet error on Windows, Mac, Android, and iOS. In some cases, the WiFi error occurs due to problems with configuration. Also, your device will have stored information about the network. When you remove and add the network again, all this information is wiped out and rewritten. If restarting your device does not solve the problem, forgetting and reconnecting to the WiFi network will surely help.
3. Use Network Troubleshooter
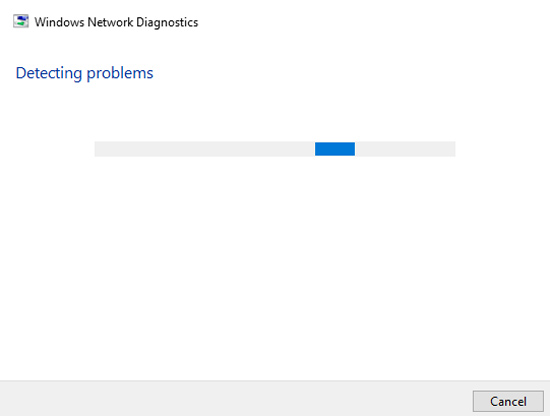
You can use the built-in network troubleshooter if the WiFi is connected but no internet error persists. This option is available on Windows, macOS, and Linux. You can open networking settings and check out the way to troubleshoot problems. In most cases, your Windows PC or Mac will tell you what the problem is. Even if the problem is not fixed, you will have a better idea in the end. If you end up with an error code, you can use it as a reference to know more.
4. Flush DNS Cache
As we said earlier, problems with DNS configuration can cause this common WiFi error. It happens when the network cannot resolve the DNS requests correctly. If you are using a Windows PC, you can solve the issue by flushing the DNS cache. To flush the DNS cache on Windows, you have to,
- Open Command Prompt
- Enter ipconfig /flushdns
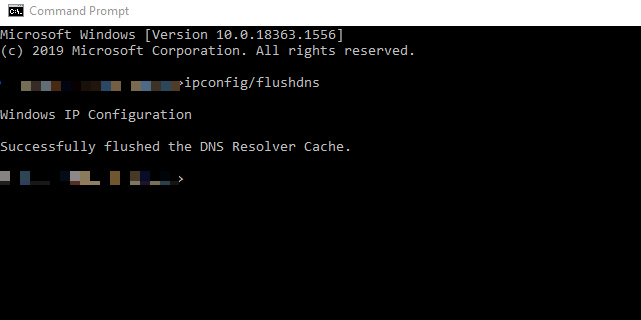
You will see a message saying that Windows has successfully flushed the DNS Resolver Cache. It works pretty magically if you ask me.
5. Switch from IPv6 to IPv4
If you are using the IPv6 system on your device, it could cause some compatibility issues. Even though IPv6 is the latest protocol for IP addresses, it is not error-free yet. Therefore, you have an increased chance of seeing the WiFi is connected but no internet error if your device is on IPv6. Fortunately, the IPv4 protocol does not have this problem. So, shifting back from IPv6 to IPv4 will help you solve the WiFi error.
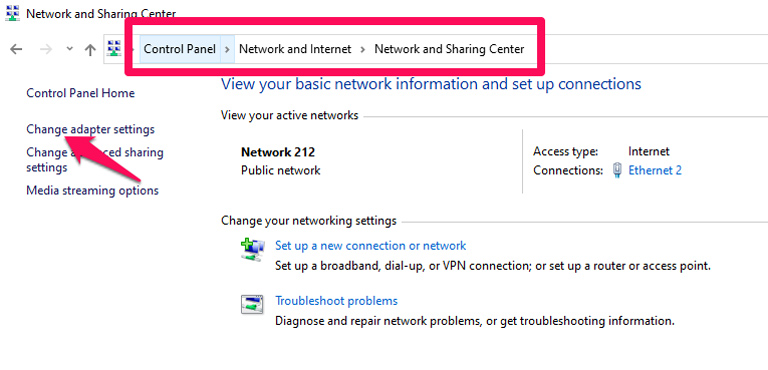
On Windows, you can go to Network Connections > Change Adaptor Options > Network Adaptor > Wi-Fi Adaptor > Properties and turn off the entry called Internet Protocol version 6 (TCP/IPv6.) You may have to reboot your computer to apply these changes. You can find this option on a Mac by going to the Network Settings.
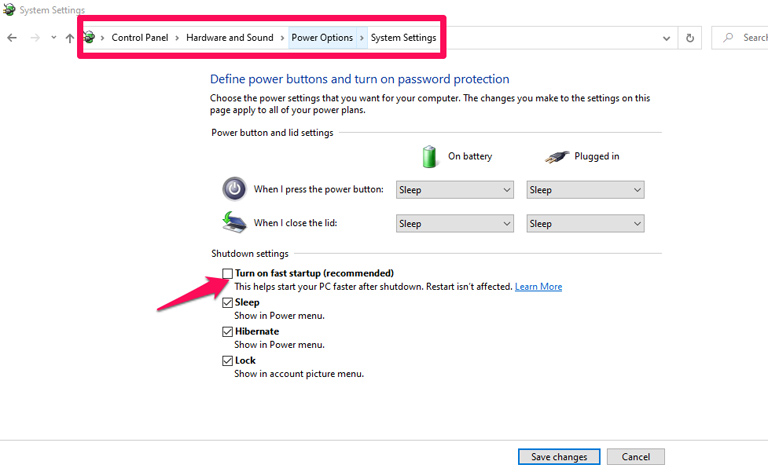
6. Disable Fast Startup
Fast Startup is a Windows 10 feature that keeps your device in a state of Hibernation instead of completely shutting down. However, in some cases, Fast Startup can cause the network settings to misbehave and cause the WiFi to be connected but with no internet error. Therefore, if your device constantly comes across WiFi errors, turning off Fast Startup will be an excellent idea.
You can go to Power Options > Additional power settings > Choose what the power buttons do > Change settings that are currently unavailable > Turn off Fast Startup. Of course, you have to restart your Windows PC to bring the changes to effect.
7. Use the Right Network Standard
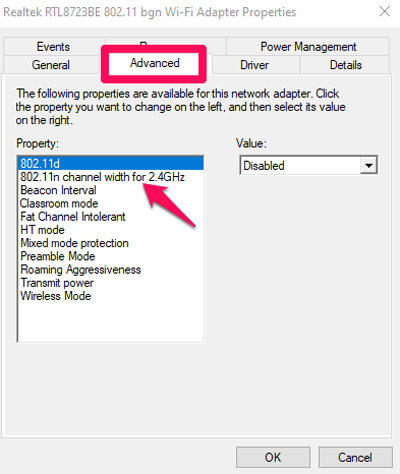
As you may already know, there are two major wireless network standards: 2.4GHz and 5GHz. 2.4GHz is the more common option, while 5GHz is faster. But even though the 5GHz band is faster, it has a shorter range. It is also more prone to network issues and driver bugs. Therefore, if you often see the WiFi connected without internet error, you should configure the wireless network in the 2.4GHz standard.
You can make these changes by going to the Network Properties. There is an option to pick between these two options. On the bright side, changing from the 5GHz band to the 2.4GHz band can also boost the coverage.
Press Win + X > Device Manager > Network Adapters > Wi-Fi Adapter > Properties > Advanced tab > Select Band or Preferred Band > Expand Value drop-down list > Select 5Ghz only or 5 Ghz Band > Ok
8. Update Network Adaptor Driver
If there is something wrong with the network adaptor driver, it may cause an error. So, you have to ensure that you are running the latest version of the network adaptor. You do not have to worry about this aspect on macOS, Android, or iOS. On the other hand, Windows users have to do this task manually.
To update the network adaptor driver, you have to open Device Manager > Network Adaptors > Wireless adaptor > Update the Driver. At this point, Windows will search the database and find the driver. If it does not find the driver, you can choose the option to install it manually.
9. Enable Automatically IP Address Obtaining
You can follow this step to fix the WiFi is connected but no internet error on Windows. At some point, you may have enabled the option to set up a static IP address. However, further changes in the network can be a problem in the long run. Therefore, it is a good idea to turn the option back to ‘Obtain an IP address automatically.”
You can enable this option by going to Network Properties > Internet Protocol Version 4 (TCP/IPv4) Properties > and choosing the option with the same name. You have to apply the changes and restart your PC. If an IP address conflict was causing the WiFi without internet issue, it must be fixed by now.
10. Network Reset
If nothing else works, you can resort to a network reset, available on PC, Mac, Android, iPhone, and other devices. You can find this option on the Settings page. This option will reset your device into the original network settings. The best thing about a network reset is that you can get rid of any problem that could be causing the WiFi is connected but no internet error. For instance, Windows will check for driver updates and prepare your system for the same. Almost the same things would happen in the case of macOS and Android.
So, if your device is causing the WiFi is connected but no internet error, a network reset should fix the issue once and for all.
How to Fix the WiFi Connected but No Internet Error on Android?
Depending on the version of Android your device is using, you can try the following methods to fix the WiFi Connected but No Internet error.
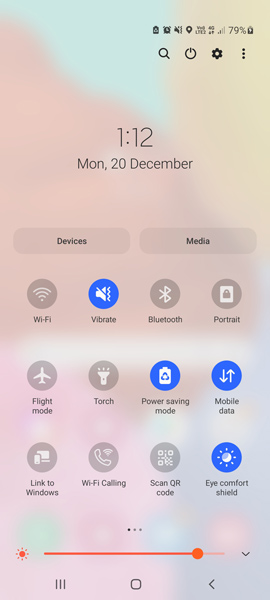
1. Turn Off and Turn On Wi-Fi
This step might seem too simple, but it can solve the WiFi Connected but No Internet error most of the time. To follow this step, you have to turn off Wi-Fi and turn it on again. It will force the device to reconnect to the network, thereby getting rid of the Wi-Fi connection issue. For better results, you can turn on Airplane Mode on your Android smartphone and turn it off after a few seconds. You can access both these options from the notification bar or by going to Settings > Wi-Fi or Settings > Airplane Mode.
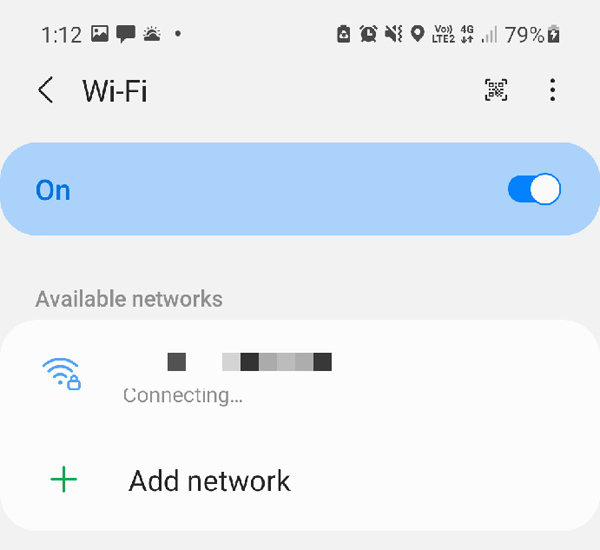
2. Forget and Add the Network
Sometimes, the information already saved about the network is responsible for the WiFi Connected but No Internet error. Therefore, it is a good idea to forget the network and add it again. Of course, you cannot do it if you do not know the password. When you Long Press on the Network Name > Forget, your device will automatically remove the password. If it is not a problem, you can go ahead and fill in the password again. It should solve the WiFi Connected but No Internet error for good.
3. Sign Into the Network
Depending on the place you are accessing the Wi-Fi, you may have to go through a sign-in process. Until the process is complete, you cannot access the internet. Therefore, you should open Settings > Wi-Fi and see if there is a sign-in prompt. If you can see the prompt, you can sign in using the credentials and get rid of the WiFi Connected but No Internet error. You may have to wait for a few seconds after signing in to get the net connection, though.
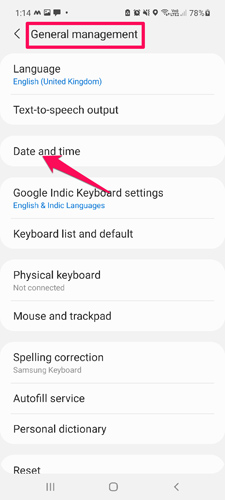
4. Check Time and Date
Did you know that your Wi-Fi connection checks the time and date before connecting? Well, it is done for a few verification-based reasons. Therefore, if you had made any changes to the date and time, it could be the reason why you see the WiFi Connected but No Internet error in the first place.
So, the natural option is to go to Settings > Date and Time and change the information. If you ask us, the best option is to grab the date and time data from your mobile data. This way, you do not have to worry about the accuracy of date or time again.
5. Reset Network Settings
If the above-mentioned solutions do not solve the WiFi Connected but No Internet error, you are better off resetting the network settings. It will make sure that your device is back to the default options as if it was a fresh one. Thus, if any specific changes are causing the WiFi Connected but No Internet error, you can stop worrying about them.

You may also want to check if you have enabled any special features for mobile data toggle. In some cases, dynamic changes from mobile data to Wi-Fi can cause connection issues. By the way, if you want to reset your Android device network settings, you can do it by going to Settings > Advanced Settings > Reset Options > Reset Wi-Fi, mobile & Bluetooth > Reset Settings. Your device may restart in the process.
How to Solve the WiFi Connected but No Internet Error on iPhone?
Many of the solutions for the WiFi Connected but No Internet error on iPhone is similar to the steps we have mentioned in the case of Android. However, there are a few additional steps that you can explore. They are as follows.
1. Turn Off Wi-Fi
Turning off Wi-Fi is a little different when you are using an iPhone. You may think that tapping on the Wi-Fi button from the Control Panel will do the job. However, it only disconnects your Wi-Fi from the network until the next day. Instead, you have to go to Settings > Wi-Fi and turn off Wi-Fi. Then, you can wait for a few seconds and turn on Wi-Fi again. It will make the device reconnect to the network and solve the issues.
2. Disable Auto Join
Most of the time, the Auto-Join option on iPhone Wi-Fi Settings is good for convenience. However, there are times when the settings option causes the WiFi Connected but No Internet error. Therefore, it is a good idea to make sure that you have disabled the auto-join option on other networks in your vicinity.
Once you have made this change, you can try connecting to the Wi-Fi network again. It should solve the WiFi Connected but No Internet error and provide you with internet access. Similarly, you may want to turn on Location Services on the device to see if the problem gets solved.
3. Disable VPN Services
Do you have any VPN apps installed on your iPhone? In that case, an active VPN connection could be the main reason for the WiFi Connected but No Internet error. So, you should turn off the VPN connection when you try to connect to the Wi-Fi.
If you want VPN access, you can connect to the service after you have connected to the Wi-Fi network in the first place. You may also want to remove the VPN profile from Settings > VPN if turning off VPN via the app does not work as you expect it to.
4. Turn Off Wi-Fi Assist
Wi-Fi Assist is a typically useful feature on iOS. It allows the system to change between Wi-Fi networks based on the performance and signal strength. However, at times, this feature can cause the WiFi Connected but No Internet error on your iPhone. Therefore, it makes sense to turn off Wi-Fi assist.
To turn off Wi-Fi assist, you have to go to Settings > Cellular > Mobile Data, and toggle the option for Wi-Fi Assist. If the issue gets solved, you may want to keep Wi-Fi Assist disabled for a while. The setting will not cause any inconvenience for the time being.
5. Reset Network Settings
Like we did in the case of Android, iPhone also offers an option to reset network settings. To do it, you have to go to Settings > General > Reset and choose the option to Reset Network Settings. You may lose all the saved passwords, but your device will be back to the default state.
We recommend this option only if you did not have success with the options we have mentioned above. It will also remove mobile data-related settings from your device if you are wondering. Therefore, you might have to spend some time with setup again.
How to Solve the WiFi Connected but No Internet Error on macOS?
These solutions are tailored for macOS. We have also mentioned the steps you have to follow to make the basic changes on your Mac.
1. Change the DNS on Your Mac
DNS is one of the many things that could cause the WiFi Connected but No Internet error on your Mac. So, it is a good idea to make sure that you are using the proper DNS for the system. There are two options: you can use the DNS from your ISP or you can use one from providers like Google or Cloudflare.
However, in some cases, the connection will not go through if you are using a third-party DNS. In that case, you have to remove the additional DNS servers from the system. To do this, you have to go to System Preferences > Network > Wi-Fi and click on the Advanced Tab.
In the upcoming window, you have to choose the DNS tab. There, you will find a list of DNS servers that you have chosen. You can easily remove or add DNS servers to the list using the + and – buttons. Once you have made all the changes, you can click on ‘Apply’ and get the job done.
2. Run Wi-Fi Diagnostics
Like Windows, macOS also has a Wi-Fi Diagnostics system. It will scan your device for potential errors and try to solve them. To access this feature, you have to hold the Option button and click on the Wi-Fi icon. You can choose ‘Open Wireless Diagnostics’ from the upcoming menu.
Then, you can follow the steps mentioned in the wizard to run Wi-Fi diagnostics service on macOS. It should solve the WiFi Connected but No Internet error if it is being caused by your Mac. On the other hand, if your WiFi router is responsible for the issue, you may refer to the upcoming section.
3. Change the DHCP Lease
DHCP Lease is also known for making issues with WiFi, especially the WiFi Connected but No Internet error. Therefore, you should make sure that your device has renewed DHCP lease once in a while. The steps to do this are simple.
You have to go to System Preferences > Network > Wi-Fi and click on the Advanced button. Now, on the next screen, you have to choose the TCP/IP tab and click on the button to Renew DHCP Lease. It may take a few seconds, but you can expect to solve the WiFi Connected but No Internet error.
Troubleshooting WiFi Connected but No Internet (Full Network Fixes)
If you get the WiFi is connected but no internet error on all devices, it is a different story altogether. If every device connected to the network gives you the same error, you can guess that your network is responsible for the error. In that case, you should follow the solutions we have provided below.
1. Restart the Router
Restarting your WiFi router is the first and basic step to fix the WiFi is connected but no internet error if it appears on all devices. You have to turn off the router, wait for 30 seconds, and turn it on again. Doing it can reconnect your device to the internet, thereby solving the error. In most cases, you can get back to the web in a few seconds.
2. Check the Cables
If restarting the router does not help, you should check the cables to your WiFi router and the modem. If the cable to the ISP is broken, you may still have the WiFi connection but lack internet access. So, it will be good to check the cables and re-plug them if necessary. In case you encounter broken cables, you can contact your ISP for technical support.
3. Contact Your ISP
The WiFi is connected but no internet error may occur when something is wrong with your ISP. If the ISP is facing any issues regarding connectivity, your WiFi network will work but will not have internet access. So, it is a good idea to make sure that your ISP infrastructure is fine. If they say that their service is fine, you can move to the advanced steps.
4. Reset the Router
You can reset the WiFi router to make sure that you troubleshoot all potential problems. You can do it using two ways. One, you can use the WiFi router control panel to reset the system. Two, you can use the physical ‘reset’ button to restore it back to its original settings. You can do it with the help of a SIM ejector tool or a piece of paper.
5. Create a New Network
If these methods do not work, you will have to create a new WiFi network. Do make sure that you use a new SSID for the network, though. Otherwise, your devices may mistake the new network for the old one. With a new WiFi network, you can almost always get rid of the Wi-Fi connected but no internet error. It is one of the extreme steps, though.
Frequently Asked Questions

How do you fix WiFi is connecting but no internet?
This WiFi error may occur due to problems with your device and the network. You can reset all the network settings of your device to fix the problem. On the other hand, if the problem is with the network itself, you may have to reset the router and get started with a new WiFi access point.
Why is my internet not working even though it is connected?
You may not have an internet connection even though it is connected if there is something with the LAN cable. For instance, if the ISP faces some issues, your device will still connect to the WiFi network. However, it will not have access to the internet.
Why does my phone say connected to WiFi but no internet?
It means the device could connect to the WiFi network, but the network does not have internet access. There could be a number of reasons for this issue. Sometimes, the ISP may not have an active internet connection, but sometimes, it is an issue with cables.
How to reset your WiFi network on Windows?
You can reset your WiFi network on Windows by going to Network settings > Properties > Reset now. It is a good way to clear all the issues with your WiFi network and start afresh. However, you may have to restart your PC to get everything running correctly.
The Bottom Line
We believe this guide helped you solve the WiFi is connected but no internet error once and for all. We will recommend that you follow the solutions in the given order. In most cases, you can get rid of the error when you reach the third or fourth solution. And, if you feel confused at any point, you must contact the ISP or other technical support.
We monitor networking trends weekly to keep this guide current. If these steps do not resolve your issue, it may indicate a localized ISP outage or a physical hardware failure in your router’s radio. We recommend checking a service like DownDetector before proceeding with a full factory reset of your equipment.


Leave a comment
Have something to say about this article? Add your comment and start the discussion.