If you know how to design a WordPress header then you can customize any WordPress theme to suit your niche. You can use your own photographs if you wish and design your own header text. You will no longer find other WordPress blogs that look the same as yours. Your headers will be unique in both text and graphics.
Many people know how to do this using Photoshop, but is it really worth spending over $500 if all you want to do is design headers? You could use Photoshop Elements which is considerably less expensive, but why not just use free software?
Free Graphics Software
There are various types of free software available online, including Open Source (e.g. Apache, Linux, Firefox, and Android) and applications offered under the Free Software Foundation. There is also freeware, which is free to use but is generally still ‘closed source‘ or proprietary, such as Skype and the Adobe PDF reader.
Here are two forms of freeware that you can use completely free of charge, namely Paint.net and XHeader. We shall be using both of these in this tutorial.
Paint.net
Panit.net is a simple but powerful Windows graphics editor that was originally designed as a free version of Microsoft Paint but has now developed into something that many believe to compete with Photoshop for most applications.
It can be downloaded from www.getpaint.net
XHeader
This is another free software application that can be used to convert graphics into headers. You can use it to add text to headers designed using Paint and resize them to the exact dimensions required by your WordPress theme.
It can be downloaded from www.download.cnet.com/XHeader/3000-2191_4-10900367.html
While it is true that many free software applications also come with malware, these two packages originate from reputable sources and no adware, trackers or viruses have been reported with them. If this worries you, simply download them then run the antivirus software you use. CNet and paint.net are generally good, clean sources for free software.
Free Images
In order to create your new header, you will likely need images – unless your design is all text. Your images can be your business logo, a photograph of yourself or your team, or other types of clipart/photographs. You can use your existing stored images, take photographs and use these or download free images.
If you use free images, make sure that you can legally use them, and if so then what attribution you must provide if any. You can use Microsoft Clipart, although there are also a number of online sources for watermark-free images. A Google search should give you some good sources.
One of these is 123RF, which offers an excellent selection of free images. You must first register, and then you can carry out a search. Most images are paid, but the smallest sizes of the images in the ‘free’ section’ are completely free of charge, without any restrictions in their use.
The free 123RF images are not particularly small. One of those is being used for this demonstration and is 10.5 cm, x 15.9 cm output size. More than enough for a good header image. You can browse the free images here: http://www.123rf.com/search_free.php?
Once you have downloaded the software and the images you intend to use in your WordPress header, and have made a note of where you have stored them, you are all set to start.
Before you start work on your header you might want to play around with the software first. This will give you an idea of what is possible, and perhaps also some new ideas about the types of embellishments and font sizes you may want to work with.
The sequence of steps involves:
- Download the two free software packages above.
- Determine the dimensions of the header for your WordPress theme. For example, the 2010 theme is 940px x 198px while the 2013 theme is 1600px x 230px.
- Draft out a rough drawing of how you want your header to look.
- Download any images or logos you require.
- Use Paint to design the graphics part of the header.
- Use XHeader to write and place the text.
- Repeat step 6 for any additional text or embellishment required.
How to Design a WordPress Header Using Paint.net
Fire up Paint, and set up a canvas sized to the requirements of your WordPress theme. We are using 2010 here, so it is 940 x 198 pixels.

Click on ‘Canvas Size‘ then set the dimensions as shown below:
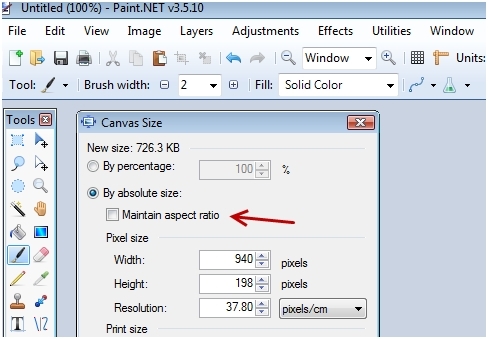
Make sure you click to uncheck the ‘Maintain Aspect Ratio’ box as show, or you will not be able to set the height correctly. The canvas you will be working with will now be displayed in the center of the screen.
What you do next will depend upon how you have designed your header. You may have a logo along with pictures and text as I am about to do here. Whatever your chosen design looks like, you should now take each element and size it appropriately.
For demonstration purposes we shall design a WordPress header for a hair salon. Keep in mind that this is a demo, and once you understand the basics you can let loose with your artistic flair to produce your own masterpiece. I am using two photos and a logo, the photos taking up the full height of the header – 198 pixels.
My first original is 450 x 373 px as you can see here:
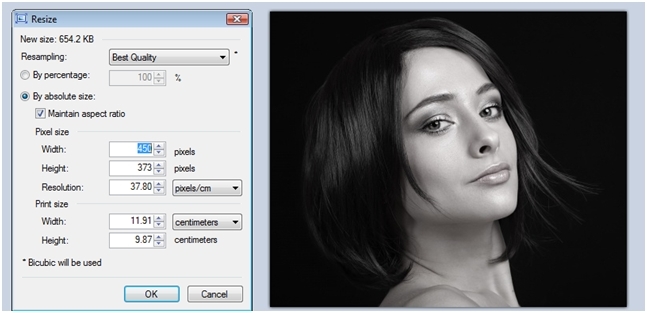
I want to change the height to 198px, the same as the standard header height. To do this, click on ‘Image‘ on the top menu bar of Paint, then on ‘Resize‘ – you will see the screen above. This time you must maintain the aspect ratio, to keep the head dimensions correct.
Simply reduce the height until it is 198px, thus:
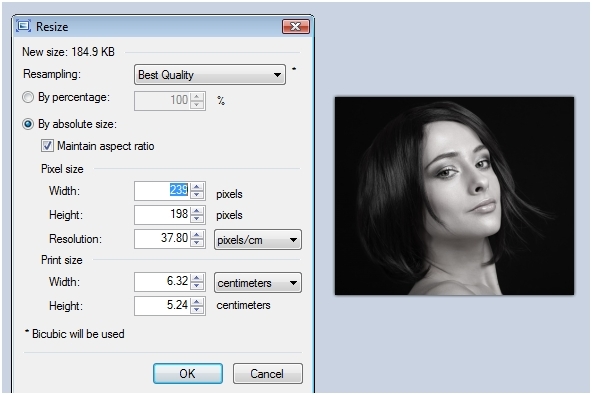
As you can see, the width changed along with the height to keep the head in proportion. Now click OK to save the new size.
So far so good, but I want the woman to be facing left, not right. Click once again on ‘Image’ in the top navbar, then click on ‘Flip Horizontal‘ – we now have:
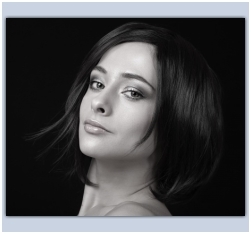
To save this, click ‘Save‘ on the File menu, and then click on OK to the bottom right of the refreshed screen.
We shall now build the header. If you look to the top right of your screen while in Paint, you will see the recent images you have been working with. This shot includes some others I have been using:

The image to the left is the canvas properly sized to 940 x 198. We must now click on that to bring it to the working area. I want to color that black, so click on ‘Window’ on the main Paint menu, and then on ‘Colors.’ Now click on the paint-pot in the Tools menu to the left:

Your cursor will now take the form of the paint-pot. Place this over the header canvas and left click. The canvas should be black. We are now ready to place the graphics on the canvas.
Placing the Graphics
With the black canvas now in the center of the screen, go up to the menu and click on ‘Layers‘.

Now click on ‘Import From File‘ – what we are doing now is to recover the formatted images and place them on the canvas where we want them. Click on your first image and it will appear in the left side of the canvas. Drag it to its correct position according to your design. For me it is to the far right:

You can see how the size of the image matches the height of the header. The white lines will disappear when you save. Now do the same with any other images, then save your header.
Color Tip: If you want to exactly match the color of the background (black here) with the background of the images, you can use a free tool known as Colorspy. This shows you the hex color code for the area that your cursor is on.
You might see a slight difference in the blackness between the two areas above: the image is 0C0C0C while the canvas is 000000. If you click on the Color menu as shown earlier, and then on ‘More,’ you can enter the hex code. The paint-pot will then fill the canvas with the same shade as the image background. This is a very useful tool to use when matching graphics as I have done below.
Now add any more graphics you want to include on your header. I will add only one more, the final result being:

Save this as a JPG file. You are now ready to add the text.
Adding Text With XHeader
Start up XHeader and click on New:

Then click on ‘Load Image From Hard Disk‘:
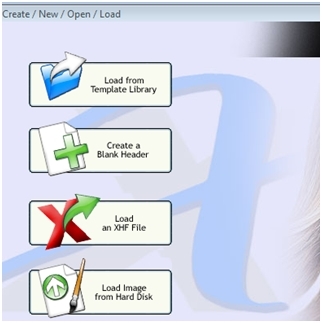
and then load your saved header. It will now be shown on the XHeader working screen, just above the control panel here:
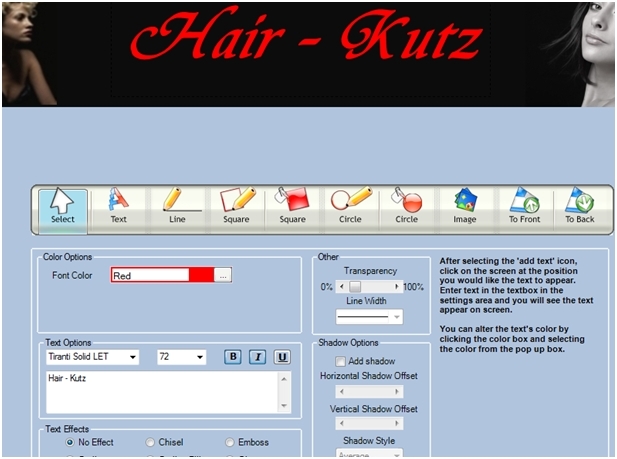
Select ‘Text‘ then choose the preferred color of your text, the font, and the size. Start typing, and it will appear in the working window and on your header. You can drag the text to any position you wish, and even add a degree of transparency if you wish your graphics to be visible behind it.
Let’s make it a bit fancier and add some embellishment. By using the ‘Circle‘ tool, you can add circles and ovals. Let’s add an oval in red with a blue shadow. The final result is:

To add further text, such as the telephone number above, you first save the header and then reload it to add more text. When you save, you get the option of saving in JPG and PNG formats. Use JPG unless you have transparent effects or rounded corners in your header, in which case PNG will reproduce these faithfully:

Design a WordPress Header: Summary
The example provided is a fairly simple form of WordPress header. The text was chosen arbitrarily and may or may not be a genuine company name. What is sure is that the design is unique as is the telephone number! You can add just about any embellishment you want, including logos, multiple images and various layers of text. Save the image using a different name each time (e.g. -1, -2, etc) so it is easy to return if you make a change you don’t like.
You can use both software applications to modify existing headers to suit your needs – you don’t have to start from scratch. Both software applications are easy to use once you get used to them, and are fun to play around with while you explore their capabilities. The headers you create are easily integrated into your WP blog.
You can use the same software to design 3-D product boxes and book covers if you have a cover template to work with.


Leave a comment
Have something to say about this article? Add your comment and start the discussion.