In the WordPress 3.0 version called the “Menu Update“, there were some nifty things added to the menu options but only a few of us uses them. The reason for this is that they need to be activated. These options are not shown as default, we need to activate. But if we make use of these options we can do a lot of cool stuff to make our blogs, and websites more unique.

To activate these options, go to your WordPress dashboard and then Appearance -> Menus. When you are at the menu options look for a button called, screen options, it should be at the top right of your screen. When you click it the following should appear.

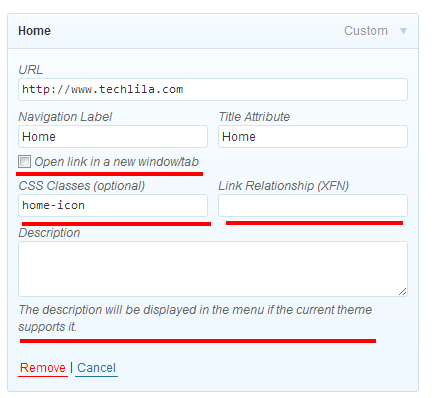
Then you can activate the ones you would like to. After you activated them, when you add a new menu item or you modify one, the options for you should look like the following:

Link Target
The first option is the “Link target”, this is pretty self explanatory. Using this option, you can change how the links in the menu open. If you tick the check box if you click on the menu link, it will open in a new tab in your browser.
CSS Classes
Using this option, you can add custom CSS classes to each of your menu links. And with that, you can stylize each menu link separately. If you know a bit of CSS, the possibilities are endless. For example: name our menu item dev and we add the following Style to it:
.dev {
    background:#efefef;
}
We should get something like this:

Link Relationship
Link Relationship is used to make relationships between links and websites easier. You can define it as “friend”, “nofollow” or whatever you’d like to. This option is the most useful when we are talking about backlinks. Using this method search engines can understand the relationship between the websites linked to each other via backlinks.
Description
You can add descriptions to any of your menu links using these options. Though not many themes support this. But you can add this option so your theme will display the description of each menu link if it is set by creating a walker script and then implementing it into your menu registration.
The Walker Script
Open your theme’s functions.php and add the following code at the bottom:
class My_Walker extends Walker_Nav_Menu
{
function start_el($output, $item, $depth, $args) {
global $wp_query;
$indent = ( $depth ) ? str_repeat( "\t", $depth ) : '';

$class_names = $value = '';

$classes = empty( $item->classes ) ? array() : (array) $item->classes;

$class_names = join( ' ', apply_filters( 'nav_menu_css_class', array_filter( $classes ), $item ) );
$class_names = '';

$output .= $indent . '

ID . '"' . $value . $class_names .'>';
$attributes = ! empty( $item->attr_title ) ? ' title="' . esc_attr( $item->attr_title ) .'"' : '';
$attributes .= ! empty( $item->target ) ? ' target="' . esc_attr( $item->target ) .'"' : '';
$attributes .= ! empty( $item->xfn ) ? ' rel="' . esc_attr( $item->xfn ) .'"' : '';
$attributes .= ! empty( $item->url ) ? ' href="' . esc_attr( $item->url ) .'"' : '';

$item_output = $args->before;
$item_output .= '<a '. $attributes .'>';
$item_output .= $args->link_before . apply_filters( 'the_title', $item->title, $item->ID ) . $args->link_after;
$item_output .= '' . $item->description . '';
$item_output .= '';
$item_output .= $args->after;

$output .= apply_filters( 'walker_nav_menu_start_el', $item_output, $item, $depth, $args );
}
}
?>
Then add your new walker script to your menu. This is NOT in your functions.php, you can find the code below where your menu is displayed.
< ?php $walker = new My_Walker; wp_nav_menu(array( 'theme_location' => 'primary-menu',
'walker' => $walker
));
?>
Conclusion
As WordPress updates, they add a lot of cool new features for us to use. So why not pay attention to them? Many people didn’t know about these options because they are hidden and require ONE click to be shown. The options listed above can make a huge difference in your blog.


Leave a comment
Have something to say about this article? Add your comment and start the discussion.