Genesis is a premium WordPress theme framework that provides a search engine optimized and secure foundation for your WordPress blog. The advantage of a premium theme is that you get support. For each Genesis child theme, there is a forum where you can ask your doubts, code snippets for modifying Genesis theme, whatever you want! This is the main reason behind many bloggers choose the Genesis theme for their WordPress blog. In this article, we will share with you a way by which you can customize various fields in Genesis child themes. Modifying the Genesis child theme is relatively simple.
Note: To modify the Genesis theme, you have to modify mainly two files – style.css and functions.php. You can modify these files through WordPress dashboard -> Appearance -> Editor.
This tutorial will not work for Genesis 2.0 version and beyond.
You can add an author box at the end of each post without touching a single line code. Under WordPress Dashboard -> Users -> Your Profile -> Genesis User Settings. Check on the box “Enable Author Box on this User’s Posts“.
But if your blog is a multi-author site then instead of editing each user profile, you can use the following code to show the author box at the end of each post. Add the following code in functions.php.
/** Add author box to end of posts **/
function abr_author_box () {
$html = '<div class="author-box">';
$html .= get_avatar(get_the_author_meta('user_email'), 75);
$html .= '<strong>About <a href="'.get_author_posts_url(get_the_author_meta( 'ID' )).'">'.get_the_author_meta('user_firstname').' '.get_the_author_meta('user_lastname').'</a></strong><br />';
$html .= wpautop(get_the_author_meta('description'));
$html .= '</div>';
echo $html;
}
add_action ( 'genesis_before_comments', 'abr_author_box', 10, 1);
The above code will add an author box below each post as shown in the figure below:

SEE ALSO: How to Add a Newsletter Signup Box After Your Post in Genesis Framework
To add author’s Twitter, Facebook, LinkedIn profile links on the author profile page first you have to create author.php in your child theme folder and add the following code into it:
<?php
/**
*
* Author template.
*
*/

add_action( 'genesis_before_loop', 'tw_custom_auth_info' );

function tw_custom_auth_info() {

if (is_author()) {
$curauth = (get_query_var('author_name')) ? get_user_by('slug', get_query_var('author_name')) : get_userdata(get_query_var('author'));?>
<div class="author-box"><?php echo get_avatar( $curauth->ID, $size = '76');?>
<h1><?php echo $curauth->display_name;?></h1>
<p>
<?php
if($curauth->user_description<>''): echo $curauth->user_description;
else: _e("This user hasn't shared any biographical information","nomadic");
endif;
?>
</p>
<br />
<?php
if(($curauth->user_url<>'http://') && ($curauth->user_url<>'')) echo '<p class="im www">'.__('Homepage:','nomadic').' <a href="'.$curauth->user_url.'">'.$curauth->user_url.'</a></p>';
if($curauth->yim<>'') echo '<p class="im yahoo">'.__('Yahoo Messenger:','nomadic').' <a href="ymsgr:sendIM?'.$curauth->yim.'">'.$curauth->yim.'</a></p>';
if($curauth->jabber<>'') echo '<p class="im gtalk">'.__('Jabber/GTalk:','nomadic').' <a href="gtalk:chat?jid='.$curauth->jabber.'">'.$curauth->jabber.'</a></p>';
if($curauth->aim<>'') echo '<p class="im aim">'.__('AIM:','nomadic').' <a href="aim:goIM?screenname='.$curauth->aim.'">'.$curauth->aim.'</a></p>';
?>

<ul><?php

$google_profile = get_the_author_meta( 'google_profile', $curauth->ID );
$facebook_id = get_the_author_meta( 'facebook_id', $curauth->ID );
$twitter_id = get_the_author_meta( 'twitter_id', $curauth->ID );
$linkedin_id = get_the_author_meta( 'linkedin_id', $curauth->ID );

/* Create Google Profile and Other Links */

if ( $google_profile || $facebook_id || $twitter_id || $linkedin_id) {
?><br /><p>Find me on:</p><?php
}

if ( $google_profile ) {
?><li><?php echo '<a href="' . $google_profile . '">Google Profile';?></li><?php
}
if ( $facebook_id ) {
?><li class="social_profile_facebook"><?php echo '<a href=http://www.facebook.com/' . $facebook_id . '>Facebook';?></li><?php
}
if ( $twitter_id ) {
?><li><?php echo '<a href=http://twitter.com/intent/user?screen_name=' . $twitter_id . '>Twitter';?></li><?php
}
if ( $linkedin_id ) {
?><li><?php echo '<a href=http://www.linkedin.com/in/' . $linkedin_id . '>LinkedIn';?></li><?php
}
?></ul></div><h2 style="margin: 0 0 40px; overflow: hidden; padding: 10px 0;"><?php printf(__('Posts by %s', 'nomadic'), $curauth->display_name); ?></h2><?php
}
}

genesis(); // <- everything important: make sure to include this.
?>
Then add the following code in functions.php.
/** Add Custom Contact Profile Fields **/
function add_custom_contact_profilefields( $contactmethods ) {
$contactmethods['google_profile'] = 'Google Profile URL';
$contactmethods['facebook_id'] = 'Facebook ID';
$contactmethods['twitter_id'] = 'Twitter UserName';
$contactmethods['linkedin_id'] = 'LinkedIn UserName';
return $contactmethods;
}
add_filter('user_contactmethods','add_custom_contact_profilefields',10,1);
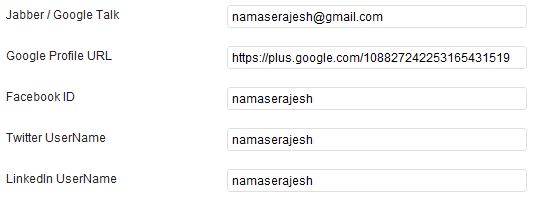
Then Under Users -> Your Profile will look like this:
Add your information there and you have done it. Your author profile will look like this:

#3 How to Add a Comment Policy Box Before Comment Form
Many people want to add comment policy before comment form, to display comment policy, add following code in functions.php.
/** Add a comment policy box */
add_action( 'genesis_before_comment_form', 'single_post_comment_policy' );
function single_post_comment_policy() {
if ( is_single() && !is_user_logged_in() && comments_open() ) {
?>
<div class="comment-policy-box">
<p class="comment-policy"><small><h4>Comment Policy:</h4> Your words are your own, so be nice and helpful if you can. Please, only use your <strong>real name</strong>, not your business name or keywords. Using business name or keywords instead of your real name will lead to the comment being deleted. Anonymous commenting is not allowed either. Limit the amount of links submitted in your comment. We accept clean XHTML in comments, but don't overdo it please.</small></p>
</div>
<?php
}
}
Output:

#4 Edit Comment Form
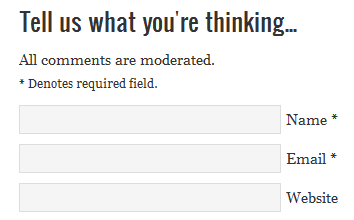
The following code will modify your comment form title and will add some text below it. Change the text as per your need. Add the following code in functions.php.
/** Edit comments form text **/
function modified_comment_form_args($args) {
$args['title_reply'] = 'Tell us what you\'re thinking...';
$args['comment_notes_before'] = ' <p class="comment-policy">All comments are moderated.</p>
<p class="required"><small>* Denotes required field.</small></p>';
$args['comment_field'] = '<p class="comment-form-comment">' .
'<textarea id="comment" name="comment" cols="45" rows="8" tabindex="4" aria-required="true"></textarea>' .
'</p><!-- #form-section-comment .form-section -->';
return $args;
}
add_filter('genesis_comment_form_args', 'modified_comment_form_args');
Output:
#5 Display Previous and Next Links After Comment Form
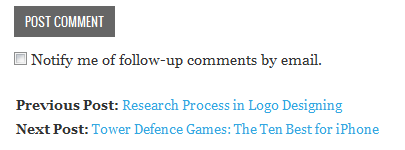
For better navigation, you must add previous posts and next post links, so users can easily switch in between posts. Also, it’ll help to reduce the bounce rate. To display previous and next post links add the following code in functions.php
/** Previous and Next Links **/
add_action('genesis_after_comment_form', 'custom_post_nav');
function custom_post_nav(){?>
<div style="font-size:13px; padding:2px;">
<?php previous_post_link('<b>Previous Post: %link') ?><br />
<?php next_post_link('<b>Next Post: %link') ?>
</div>
<?php }
Output:
If you want to move your Primary Navigation Menu after your child theme header then add the following code in functions.php.
/** Moving Your Primary Navigation after Header **/
add_action('genesis_after_header', 'genesis_do_nav');
remove_action('genesis_before_header', 'genesis_do_nav');
If you want to move your Primary Navigation Menu before your child theme header then add the following code in functions.php.
/** Moving Your Primary Navigation before Header **/
remove_action( 'genesis_after_header', 'genesis_do_nav' );
add_action( 'genesis_before_header', 'genesis_do_nav' );
If you want to move the Secondary Navigation Menu below your child theme header then add the following code in functions.php.
/** Moving Your Secondary Navigation After Header **/
Remove_action('genesis_after_header','genesis_do_subnav');
Add_action('genesis_before_header','genesis_do_subnav');
#7 How to Change “Read More…” Text to “Continue Reading…”
Many people want to change the default “Read More…” text to different text like “More…”, “Continue…”, “Continue Reading…”, etc. I always prefer “[Continue Reading …]” text. Also, we can add styles to this text so it looks better. Add following in functions.php to accomplish this.
/** Read More changed to Continue Reading... **/
add_filter( 'excerpt_more', 'child_read_more_link' );
add_filter( 'get_the_content_more_link', 'child_read_more_link' );
add_filter( 'the_content_more_link', 'child_read_more_link' );
function child_read_more_link() {
return '… <a class="more-link" href="' . get_permalink() . '" rel="nofollow">Continue Reading …</a>';}Then add the following code in style.css.
/** Customization for Read More Link... **/
.more-link {
font-size: 12px;
font-weight: bold;
float: right;
margin: 4px 0;
padding: 1px 6px;
text-transform: none;
border-radius:4px;
background-color:#DDDDDD;
border:0;font-family:Arial, sans-serif;
-webkit-border-radius:4px;
-moz-border-radius:4px;
-moz-box-shadow:0 1px 1px #AAAAAA;
-webkit-box-shadow:0 1px 1px #AAAAAA;
}

.entry-content a {
text-decoration: none;
}

.entry-content a:hover {
text-decoration: underline;
}
Now your “Continue Reading” button will look more professional, more stylish.

#8 Add Support for Custom Background
If you want a custom background then add the following code in functions.php.
/** Add support for Custom Background **/
add_custom_background();
#9 Add Support for Custom Header
If you want a custom header then add the following code in functions.php.
/** Add support for Custom Header **/
add_theme_support( 'genesis-custom-header', array( 'width' => 920, 'height' => 150, 'textcolor' => 'ffffff', 'admin_header_callback' => 'nomadic_admin_style' ) );
Don’t forget to change the child theme name, here e.g. we’ve used “nomadic” as a child theme name. You can adjust the width, height and textcolor values. Adjust them according to your need.
#10 Remove or Change Title and Description
If you want to remove Title and Description then add the following code in functions.php. This is useful when you decide to use the site logo instead of text for the site title.
/** Remove Title and Description **/
remove_action( 'genesis_site_title', 'genesis_seo_site_title' );
remove_action( 'genesis_site_description', 'genesis_seo_site_description' );
Add the following code in functions.php to add a custom site title.
/** Remove default site title and add custom site title **/
remove_action( 'genesis_site_title', 'genesis_seo_site_title' );
function custom_site_title() {
echo '<h1 id="title">Tips and Tricks</h1>';
}
add_action( 'genesis_site_title', 'custom_site_title' );
#11 Remove Post Title
Add the following code in functions.php to post the title.
/** Remove post titles **/
remove_action( 'genesis_post_title','genesis_do_post_title' );If you want to remove the default footer text and want to add your text then add the following code in functions.php.
/** Customize the entire footer */
remove_action( 'genesis_footer', 'genesis_do_footer' );
add_action( 'genesis_footer', 'child_do_footer' );
function child_do_footer() {
?>
<p><!-- Your Custom Text OR Code --></p>
<?php
}
If you want to change the “Post Comment” text in the comment form of your website then add the following code functions.php. The following code will change the “Post Comment” text to “Submit Comment”.
function change_comment_form_submit_button_text( $defaults ) {
$defaults['label_submit'] = 'Submit Comment';
return $defaults;
}
add_filter( 'comment_form_defaults', 'change_comment_form_submit_button_text' );
#14 Modify Size of Comments Gravatar
If you want to modify the size of Gravatar in the comments then add the following code functions.php. Change 65 number according to your need.
function child_comment_list_args( $args ) {
return array( 'type' => 'comment', 'avatar_size' => 65, 'callback' => 'genesis_comment_callback' );
}
add_filter( 'genesis_comment_list_args', 'child_comment_list_args' );
If you have any questions, then please feel free to ask in the comments below. Also don’t forget to share this article on Twitter, Google+ and on Facebook. We truly appreciate your support.


Lucky
Hey can I increase the page and post fonts or change it? If yes how?
Rajesh Namase
Hello Lucky,
Depending on the theme, you need to find the CSS class and add font-size: 18px; to it. Try adding this code to your theme’s Style.css file:
.single .entry-content {

font-size: 18px;

}
William
Why is it when I try changing ANYTHING in the child css NOTHING changes?